
This guide is specific to Texas agents transferring to Real Brokerage. If you're in another state, contact Real Onboarding for state-specific guidance.
Texas Real Estate License Transfer Guide
Complete your transition to Real Brokerage in 6 steps
Estimated total time: 3–4 hours
Don't want to do this yourself?
A Real TC can run the entire transition for you — $249, start to finish.
Learn more & book your TCFrequently Asked Questions
Brokerage & Forms
Do I use Dotloop or Zipform?
Both are supported at Real. Dotloop is included as a HAR benefit for HAR members — if you're part of HAR, you likely already have access. Zipform is also fully supported. Choose whichever platform you prefer, then follow our step-by-step setup guide to configure your profile and templates.
What is Real's broker information for my forms?
Real Broker, LLC | License #9003138 | 5718 Westheimer Rd, Ste 1000, Houston, TX 77057 | (855) 450-0442 | Broker/Licensed Supervisor: Michael Yarrito, License #491108
How do I get a TX state Real Broker to sign a form I need completed for my MLS or office?
If you need Real Broker to sign a document you set up for the form in DocuSign and send to the broker signature account which is txsign@therealbrokerage.com
What documents should I include in my templates?
We recommend setting up three folders — Compliance, Offer/Buyer, and Listing/Seller — with the standard Texas forms. Our template setup guide lists every form you need in each folder, including IABS, TREC contracts, Real's ABAD, Consumer Choice Disclosure, and more.
What is Sellers Shield?
Sellers Shield is Real's partnered platform for Seller's Disclosures. It's free to use and provides added compliance support and protection. You're welcome to explore it and see if it fits your workflow — no subscription fees.
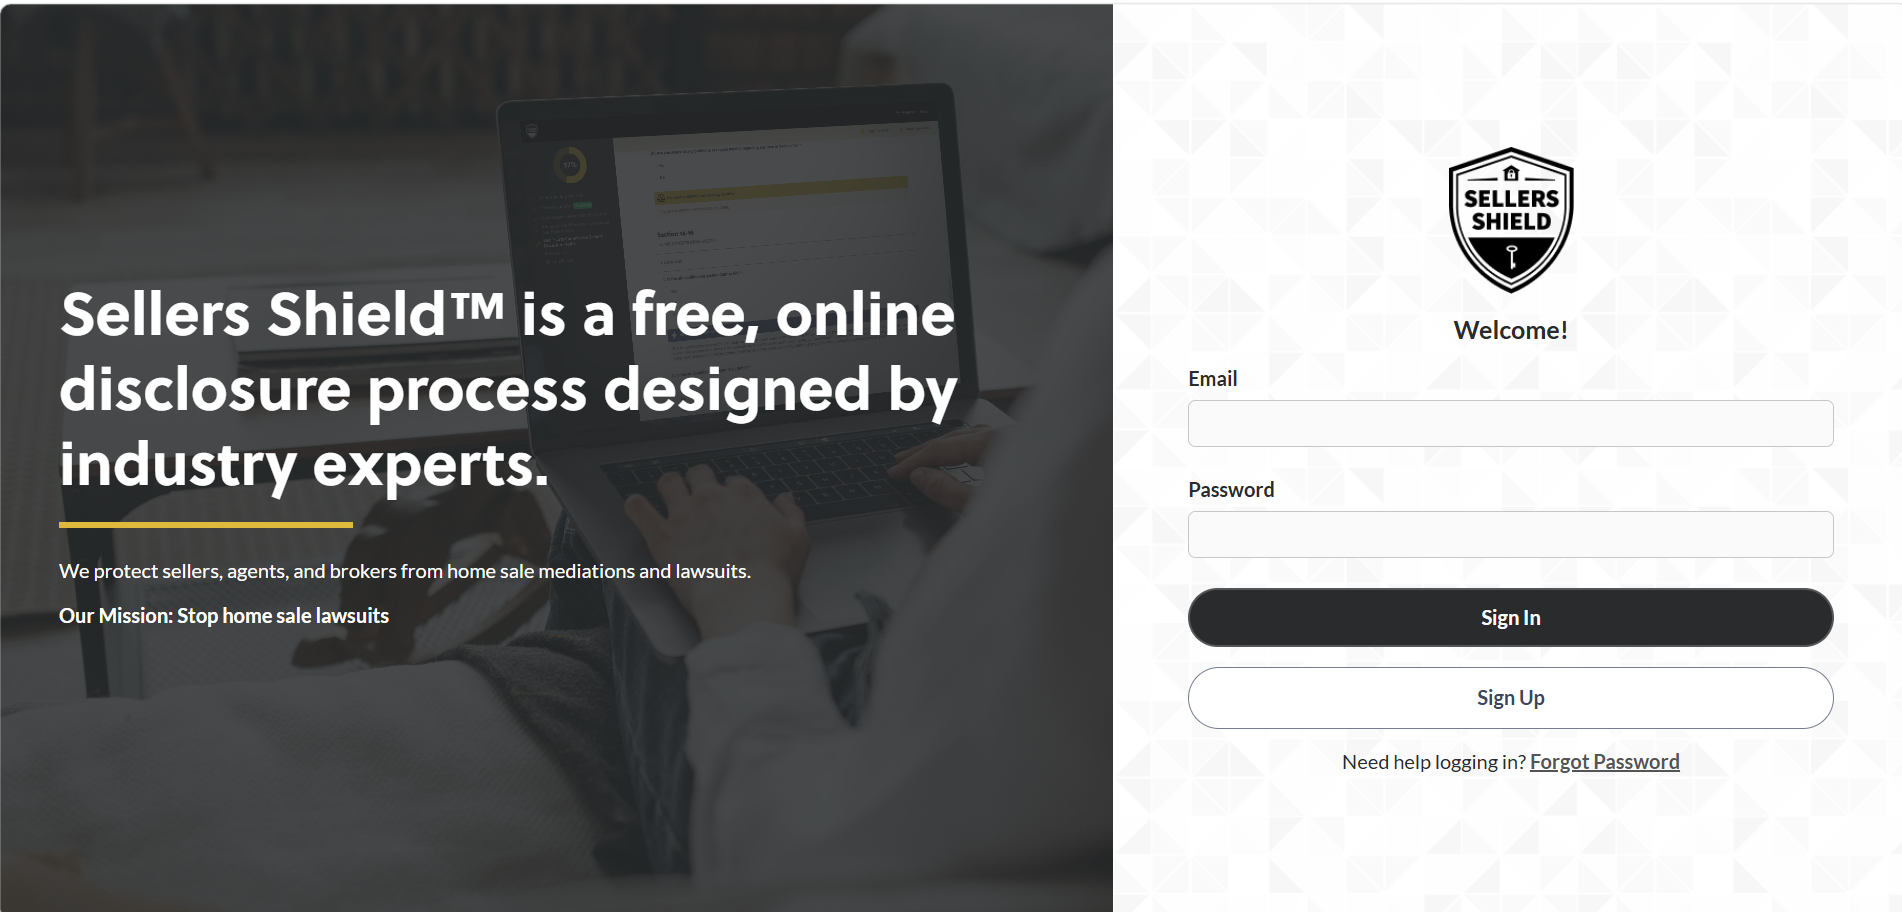
Sellers Shield login page — sign up or log in to access free seller's disclosures
How do I transfer buyer rep agreements and pending contracts?
Review your Independent Contractor Agreement (ICA) with your current broker to understand your obligations. Some agreements allow a clean exit; others may require a fee or notice period. Work with your current broker to determine a plan that is above board, and establish a plan for current active listings, clients under contract and buyers with active buyer representation agreements.
Transactions in reZEN
Should I create a listing or a transaction first in reZEN?
If you're the listing agent, create a Listing first — then convert it to a Transaction when you go under contract. If you're representing a buyer only, go straight to My Transactions and create a new Transaction.
What's the difference between the listing-side and buyer-side setup?
Listing-side starts in My Listings and includes property details, seller info, and commission splits. When it goes under contract, you convert it to a transaction and add buyer info. Buyer-side starts directly in My Transactions with property, buyer/seller info, and commission all in one flow.
Where can I see all my deals in reZEN?
Active listings are under My Listings. Once a deal is under contract or if it's a buyer-only transaction, it appears under My Transactions. Both are in the left sidebar.
What are the most common mistakes agents make in reZEN?
Three big ones: 1. Uploading to File Cabinet but not attaching to checklist — An agent uploads all required documents into the File Cabinet and thinks the task is complete. However, the checklist still shows items as incomplete because the documents were never attached to the correct checklist tasks. This delays compliance review. Always attach each uploaded document directly to its corresponding checklist item. 2. Forgetting to update the sale price — An agent marks a listing as under contract but forgets to update the sale price. The transaction record still shows the original listing price, which usually won't match the executed contract. This creates issues when the commission is being prepared. Always update the sale price in reZEN when marking a listing as under contract. 3. Skipping commission or referral fields — An agent submits a transaction but leaves the commission and referral fields blank, assuming they can be completed later. This causes confusion during closing because the brokerage cannot verify commission splits or referral payouts. The transaction may be paused and can result in an inaccurate CDA. Always complete all commission and referral fields before submitting the transaction for review.
Is there a video walkthrough for my first transaction?
Yes. Real Academy has a step-by-step video course that walks you through creating listings, buyer transactions, and uploading compliance documents in reZEN. It covers the same workflow as this guide but in video format.
CRM & Tools
What CRM options do I have at Real?
Real agents have three main CRM options: (1) Lofty — available at a discounted rate through Real, integrates well with your workflow. (2) HAR CRM — free for HAR Platinum members. (3) LEO AiRM — Real's own AI-powered CRM, currently in beta. You're not locked into any one platform — choose whichever fits your business best.
How do I set up Lofty?
Lofty is available at a discounted fee through Real and integrates well with your existing workflow. The knowledge base article below has setup instructions and Lofty's direct contact information if you need help getting started.
What is LEO AiRM?
LEO AiRM is Real's own AI-powered CRM, currently in beta. It's being built specifically for Real agents and will integrate directly with reZEN and other Real systems. You can start exploring it now, though some features are still being rolled out.
Compliance & Documents
Where do I upload documents for compliance?
Open your transaction, click the Checklist tab, and upload documents directly to each checklist item. You can also drag files into the File Cabinet or email them to your transaction's unique email address.
What do Required, Applicable, and Optional mean on the checklist?
Required items must be uploaded for every transaction. Applicable items are situational — upload them if they apply to your deal. Optional items are for your records but not required for compliance.
What does 'Pending' status mean after I upload a document?
Pending means your document has been uploaded and is waiting for your Broker to review it. Once approved, the status changes to Completed. If there's an issue, your Broker will reach out.
What's the fastest way to upload documents?
Drag and drop files directly into the File Cabinet, or email documents to your transaction's unique email address. Both methods get files into reZEN in seconds — then attach them to the right checklist items.
Support & Onboarding
Who do I contact if I need help with setup?
Text HPT's success team at (281) 729-9180. They can help with document templates, Dotloop/Zipform configuration, Sellers Shield, and other onboarding questions.
Who can I contact to help my team move over and get set up?
Contact Kristy Banks, One Real — Team Onboarding & Success. She can help with training your admin team.
Where can I find Real's full training program?
Real Academy has a complete training series covering every system, tool, and workflow you'll use as a Real agent — from reZEN and compliance to marketing and revenue share. It's self-paced and available anytime.
Need help? Text HPT admin: (281) 729-9180
Your transition checklist
Apply to Real
Submit your application to Real Brokerage using your sponsor's link. Confirm the right sponsor before you submit. Your sponsor's information appears at the top of this page.
Leave well
Leave well with your current brokerage.
Transfer your license on TREC
Use TREC REALM to transfer your license from your current broker to Real Brokerage.
Transfer HAR / MLS
Complete the HAR Transfer Form and Transfer of Listings Form to move your MLS membership and active listings to Real.
Set up reZEN
Log in to reZEN and enter your first transaction. The three guides below walk you through it.
Set up your document templates
Configure Dotloop or Zipform with Real's broker information and create your document templates so you're ready to write offers on day one.
Apply to Real
Confirm this is your sponsor
Make sure this name appears in your Real application before you submit. If it doesn't match, contact your sponsor first.
Default sponsor contact

You're viewing this guide without a sponsor link. If someone invited you to Real, ask them for their personalized link so their name appears correctly in your application. In the meantime, you can contact Bob Martin for assistance.
Goal
Submit your application to Real Brokerage using your sponsor's link. Confirm the right sponsor before you submit. Your sponsor's information appears at the top of this page.
Before you start
- You have your sponsor's application link (check the URL you were given or the top of this page)
- Your sponsor's name, email, and phone (shown at the top of this page)
- Your Texas real estate license number
- Your current brokerage name
Do this now
- 1Confirm your sponsor's name, email, and phone at the top of this page match the person who invited you.
- 2Click your sponsor's application link to open the Real application form.
- 3Fill in your name, email, phone, and Texas license number.
- 4When asked about your current brokerage, enter the name accurately.
- 5Before you submit: confirm the sponsor name shown on the application matches the person who invited you.
- 6Review and sign the ICA (Independent Contractor Agreement). Fill in the yellow fields and confirm your sponsor.
- 7Pay the application fee via Stripe.
- 8Save screenshots of your confirmation page, signed ICA, and payment receipt.
What it looks like
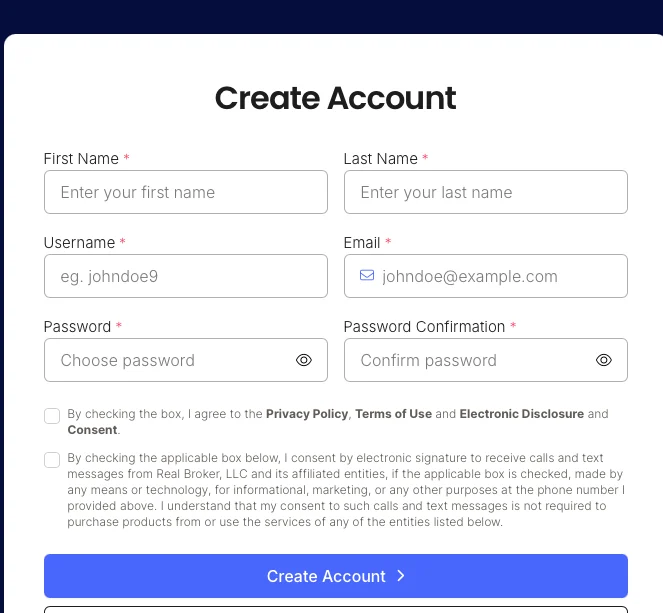
Step 1: Create your Real account with name, email, username, and password
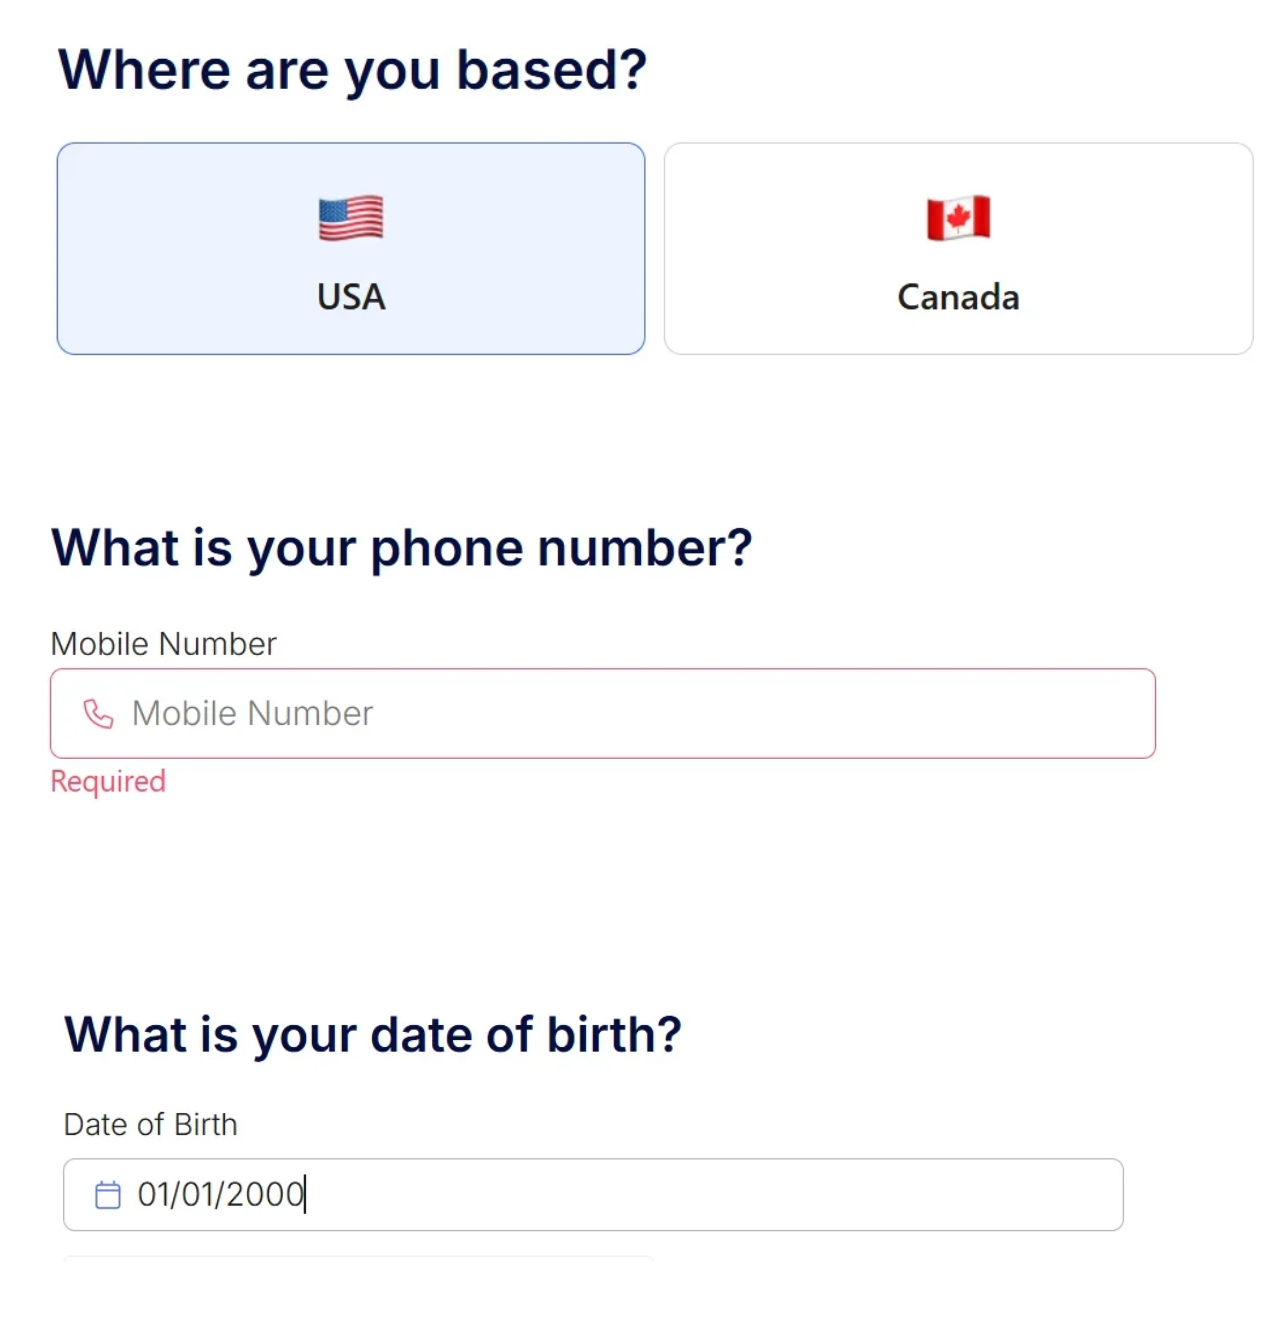
Step 2: Enter your location (USA/Canada), phone number, and date of birth
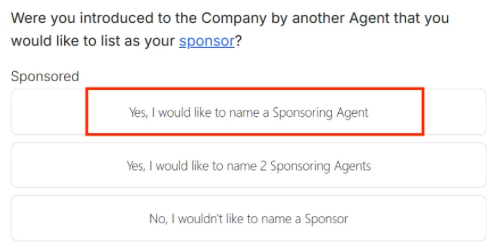
Step 3: Confirm your sponsor — verify the name and email match who invited you
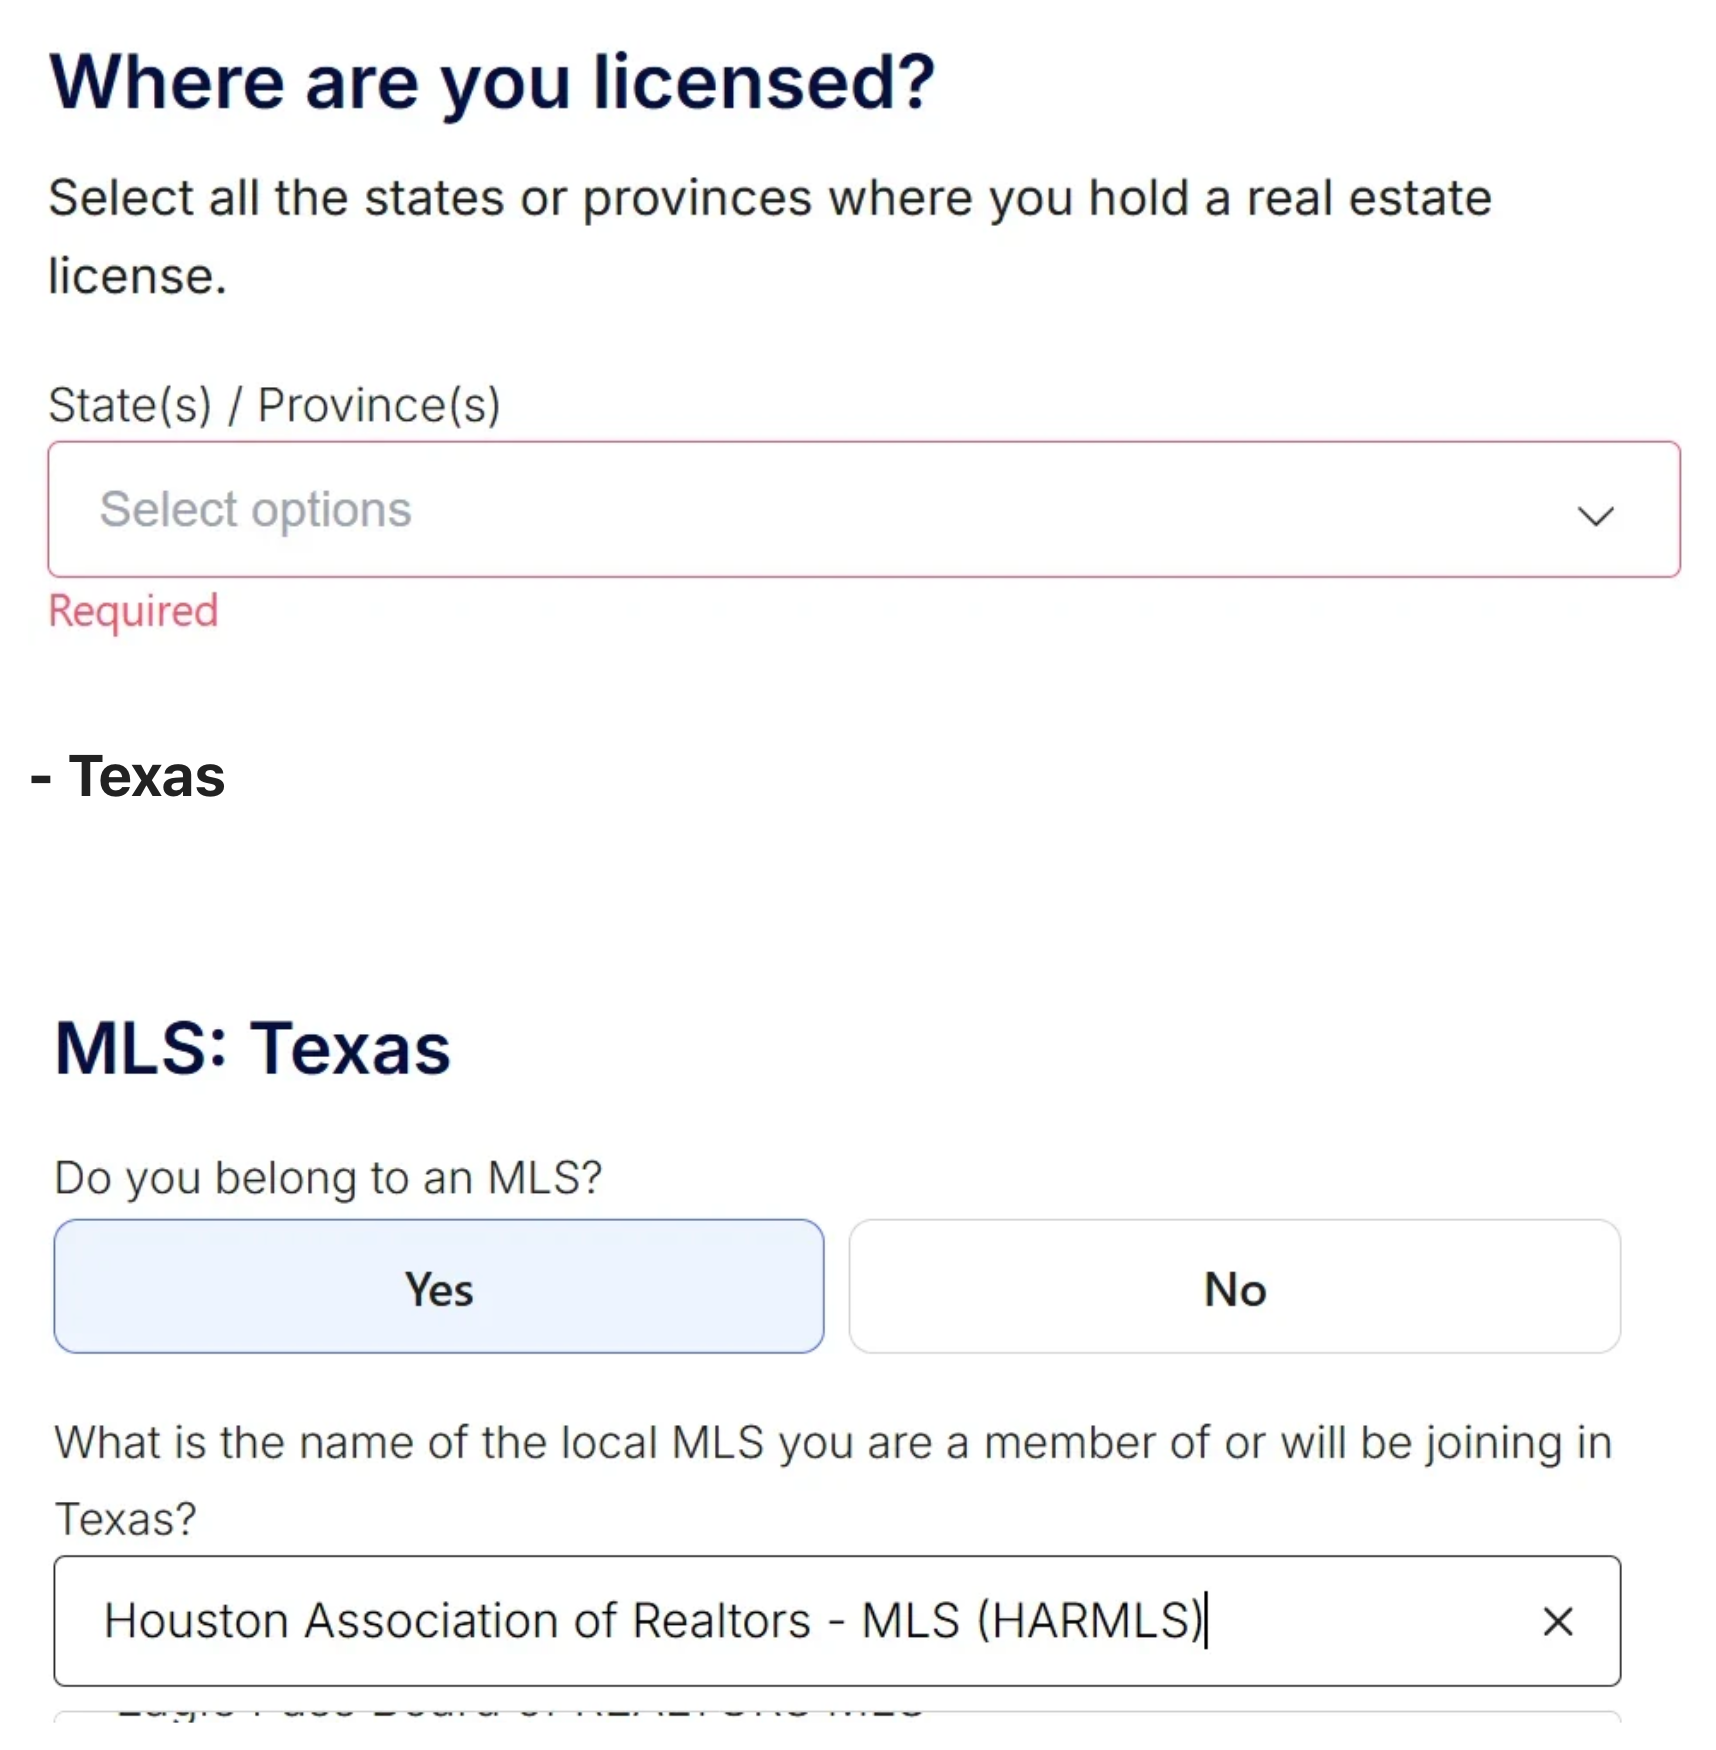
Step 4: Select all states or provinces where you hold a real estate license
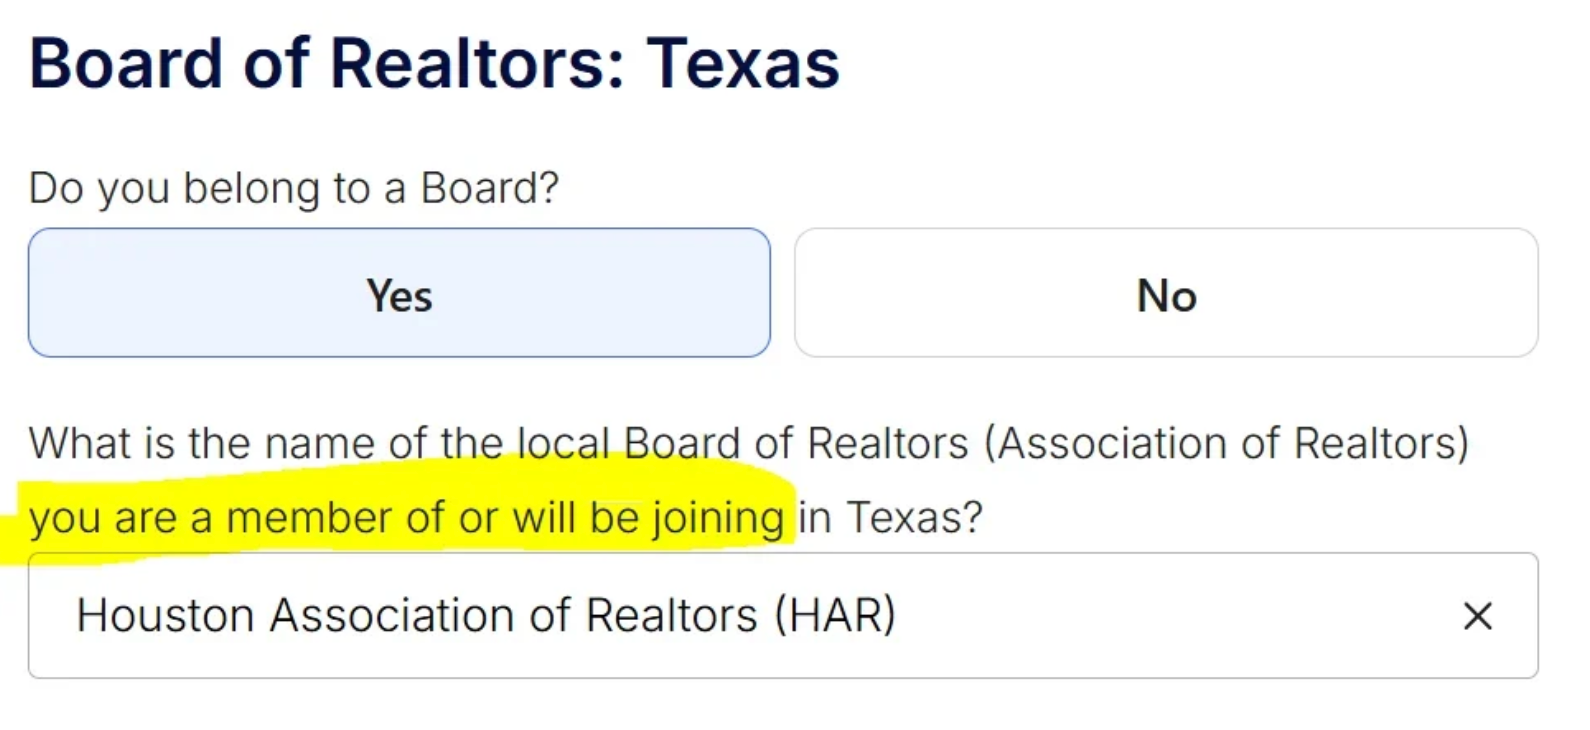
Step 5: Select your Board of Realtors (HAR if you're in Houston)
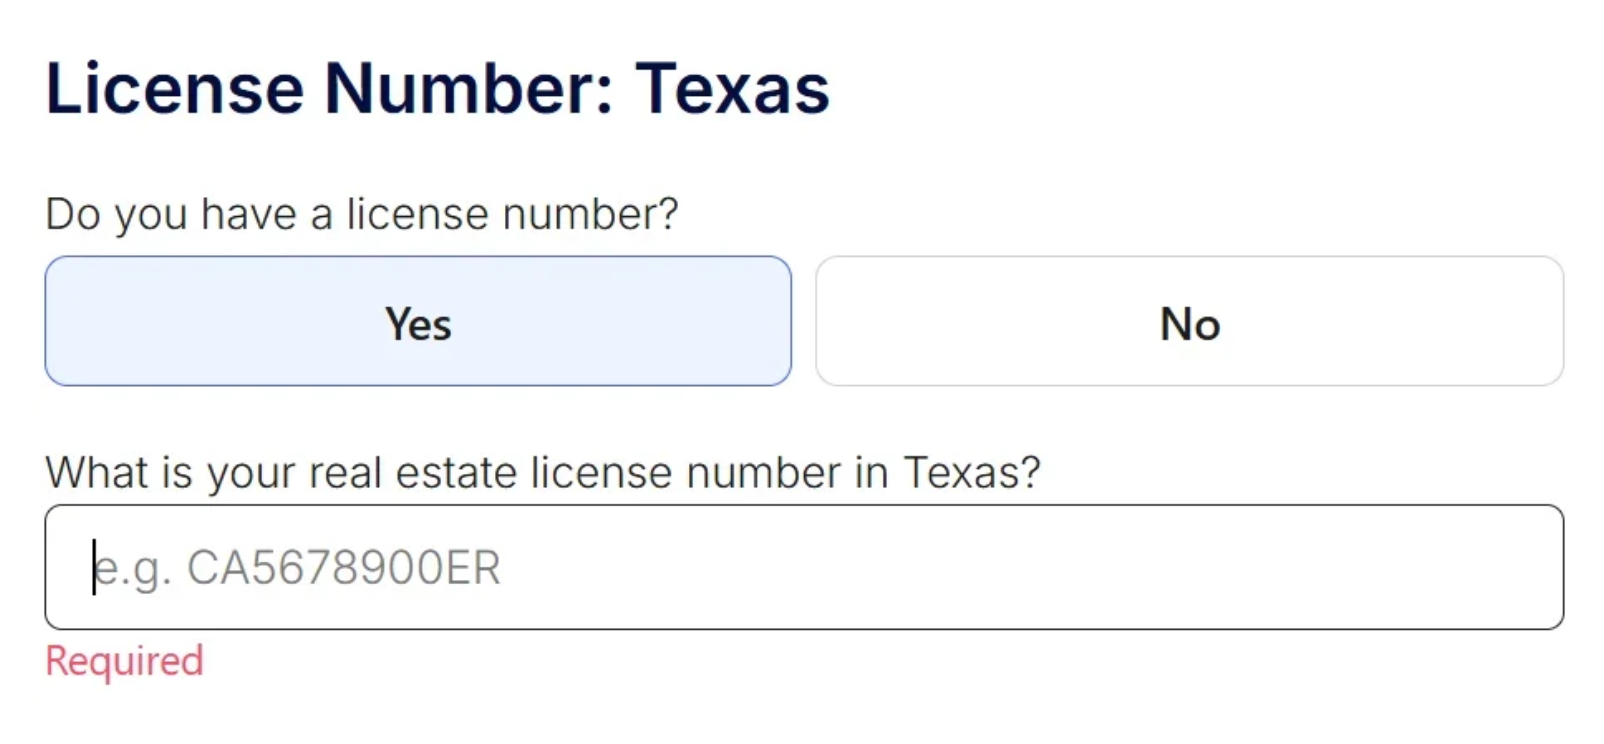
Step 6: Enter your real estate license number. Need help? Search TREC's license database
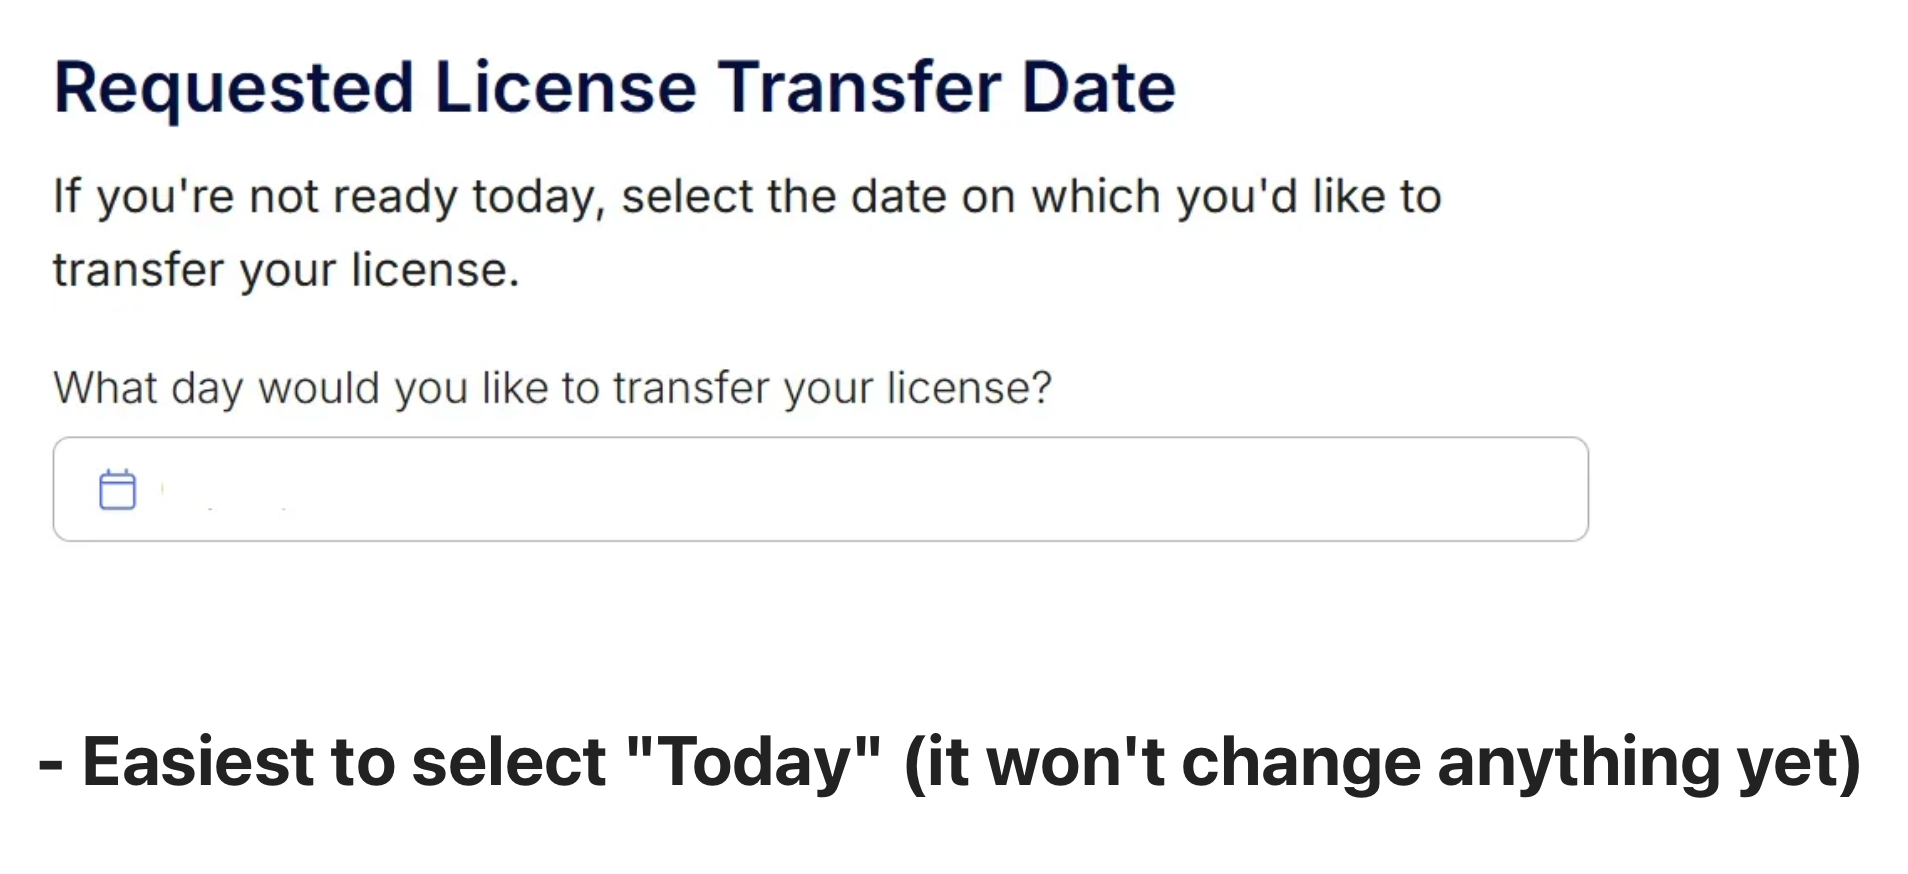
Step 7: Select today's date as your transfer date to start the process on Real's side (you can finish the rest later)
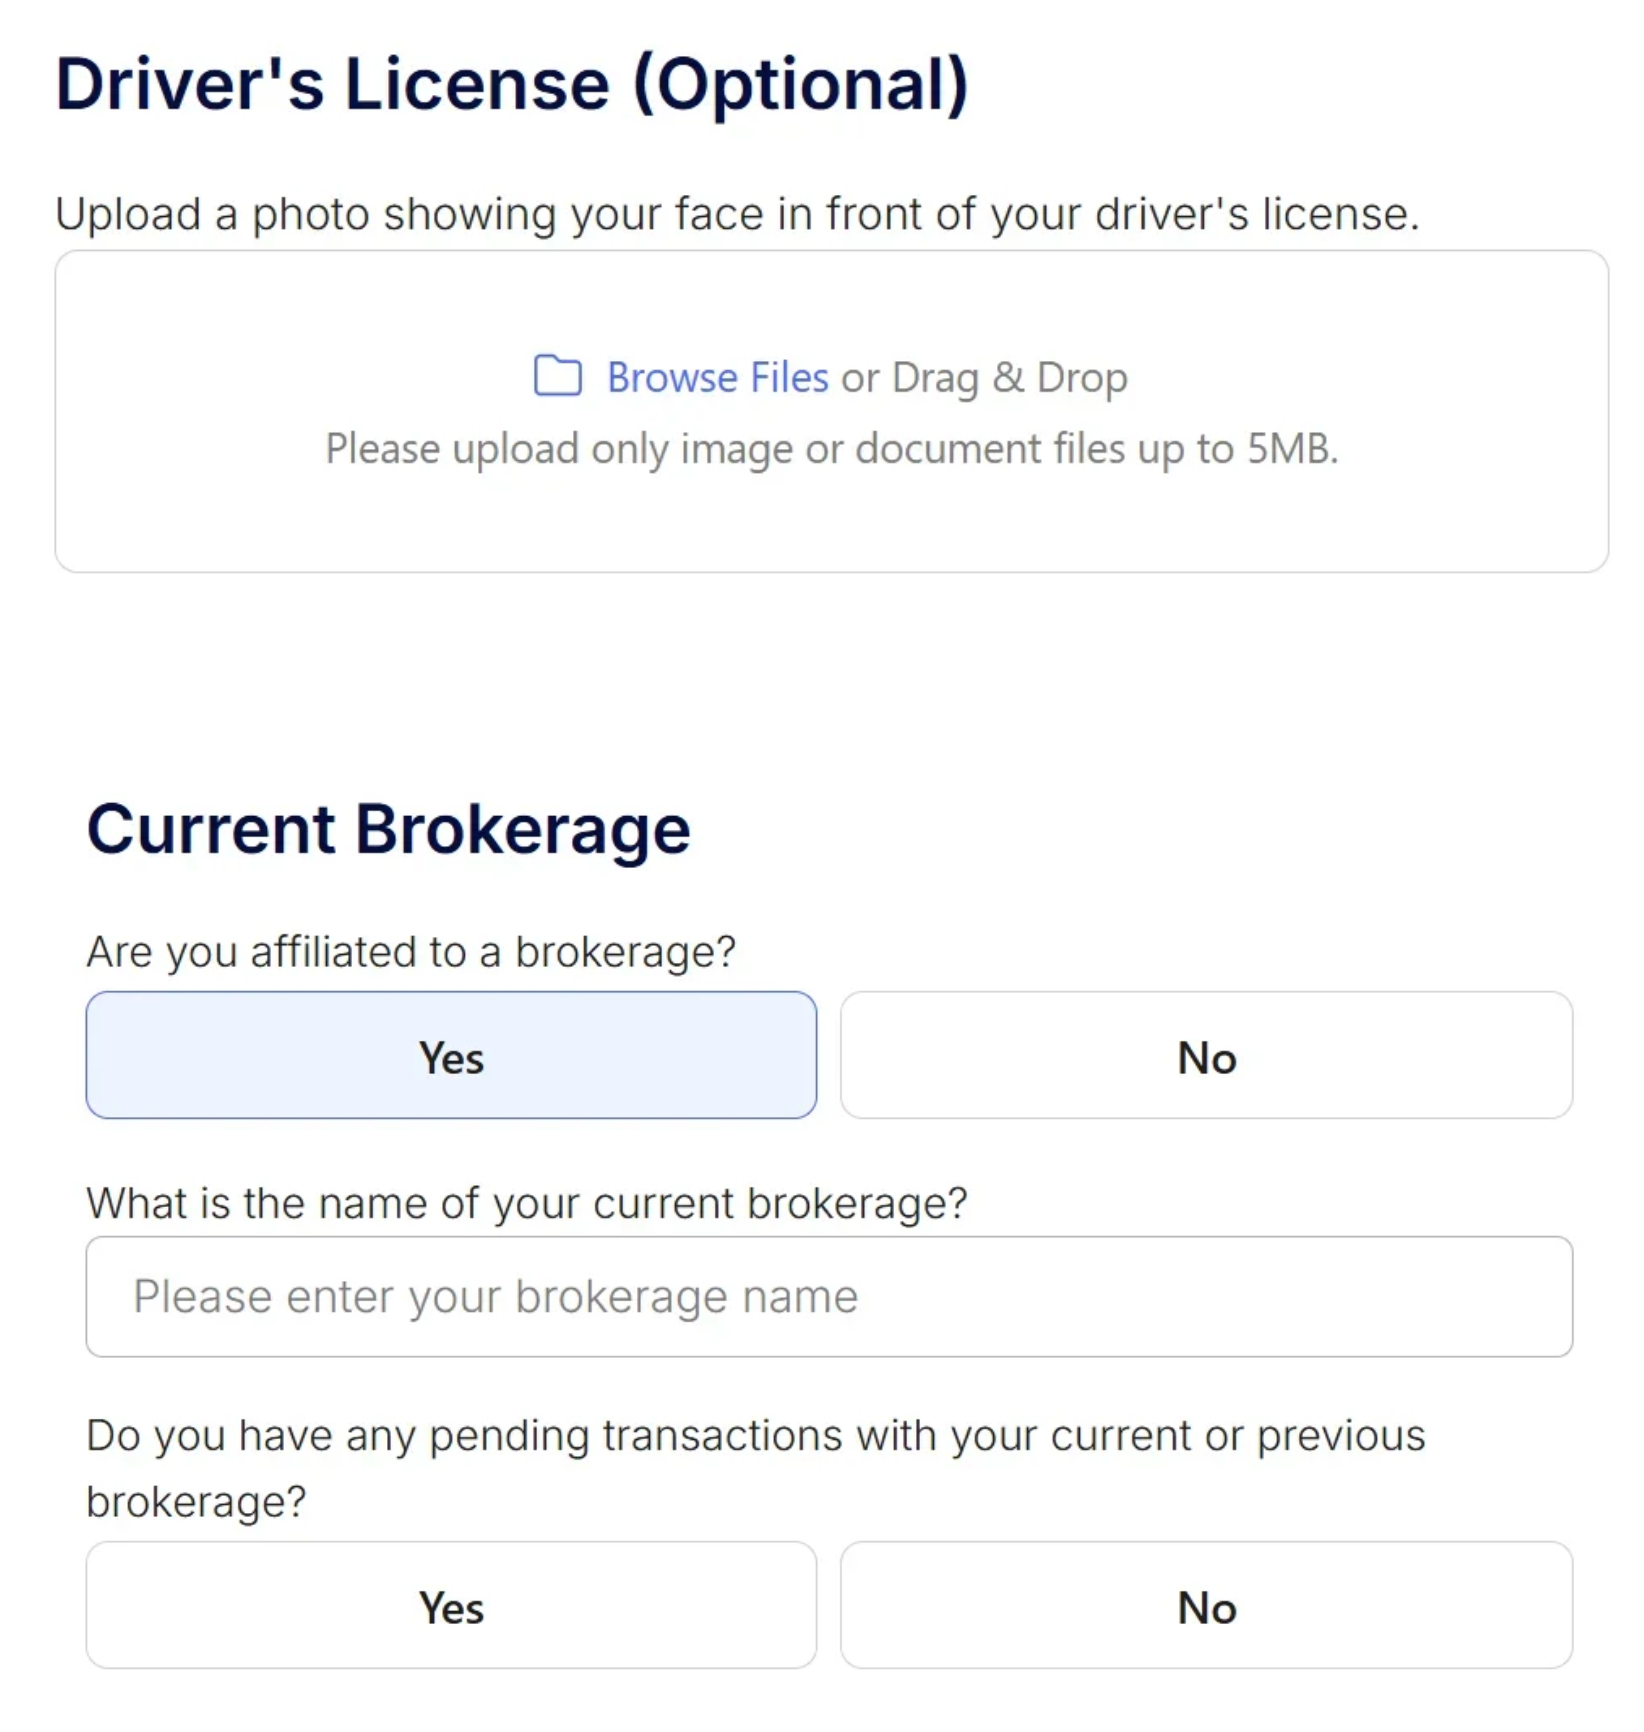
Step 8: Upload a photo of your driver's license (optional) and enter your current brokerage information
Tips
Your sponsor's information is embedded in the URL you received — if you don't see sponsor details at the top of this page, make sure you're using the correct link.
During signup, you'll choose between stock awards or cash. The stock option can be changed later — if you're unsure, it's the more flexible default.
If the sponsor name on the application doesn't match who invited you, stop and contact your sponsor before submitting.
The application fee is a one-time charge. There are no monthly desk fees at Real.
After submitting, you'll receive a welcome email from Real within 1–2 business days. Check your spam folder if you don't see it.
Need to find your license number? Search TREC's license database at https://www.trec.texas.gov/license-search/ (opens in a new window).
Select today's date as your transfer date — this starts the process on Real's side even if you don't finish everything today.
You're done with this step when:
- You verified the sponsor name and email at the top of this page matches your application
- You submitted the application and see a confirmation screen
- The sponsor name on your application is correct
- You saved screenshots of the confirmation, ICA, and payment receipt
Leave well
Goal
Leave well with your current brokerage.
Do this now
- 1Read your current independent contractor agreement before you do anything else, and follow it, including any notice requirements it sets. Talk to your own attorney about anything you are unsure of.
- 2Finish your pending transactions or hand them off the way your agreement says to. Your clients and your broker both deserve a clean handoff.
- 3Ask your broker what records you are entitled to copies of and how they want to get them to you. Every brokerage handles this differently.
- 4Tell your broker directly and professionally. This industry is small and long, and the way you leave is remembered longer than the fact that you left.
What it looks like
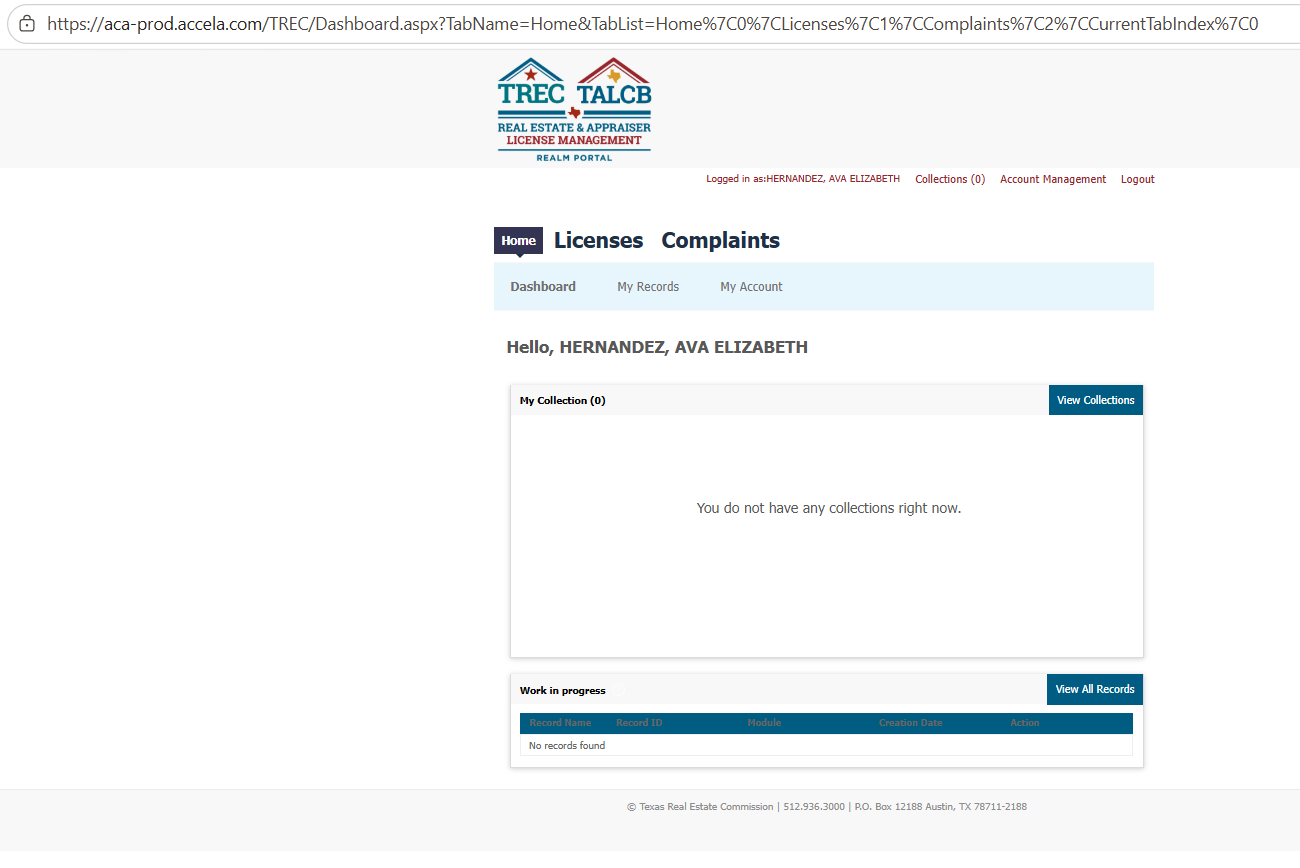
After logging in, you'll see your TREC dashboard — use this to verify your license status
Transfer your license on TREC
Goal
Use TREC REALM to transfer your license from your current broker to Real Brokerage.
Before you start
- Your current broker has released your license on TREC (check TREC's license lookup)
- You have your TREC PIN (sent via email after your current broker releases your license)
- You know Real's broker license number: 9003138
Do this now
- 1Log in to TREC REALM portal at https://aca-prod.accela.com/TREC/Default.aspx
- 2Click My Records, then find your active license and click Amendment.
- 3On the Application Information page, set License Type to 'Real Estate - Sales Agent License' and Type of Change Request to 'Change or Request Sponsorship'. Click Continue Application.
- 4On the Licensed Professional page, click Look Up. Set License Type to 'Real Estate Business Broker' and enter Real's broker license number: 9003138-BB. Click Look Up, then Continue Application.
- 5Upload any supporting documentation if prompted, then click Continue Application.
- 6On the Review page, check the certification box and click Continue Application to submit.
- 7You should see a confirmation screen. Save a screenshot.
- 8Real will receive the transfer request and process it within 1–2 business days. If your transfer doesn't appear within 3 business days, email onboarding@therealbrokerage.com using the template below.
What it looks like
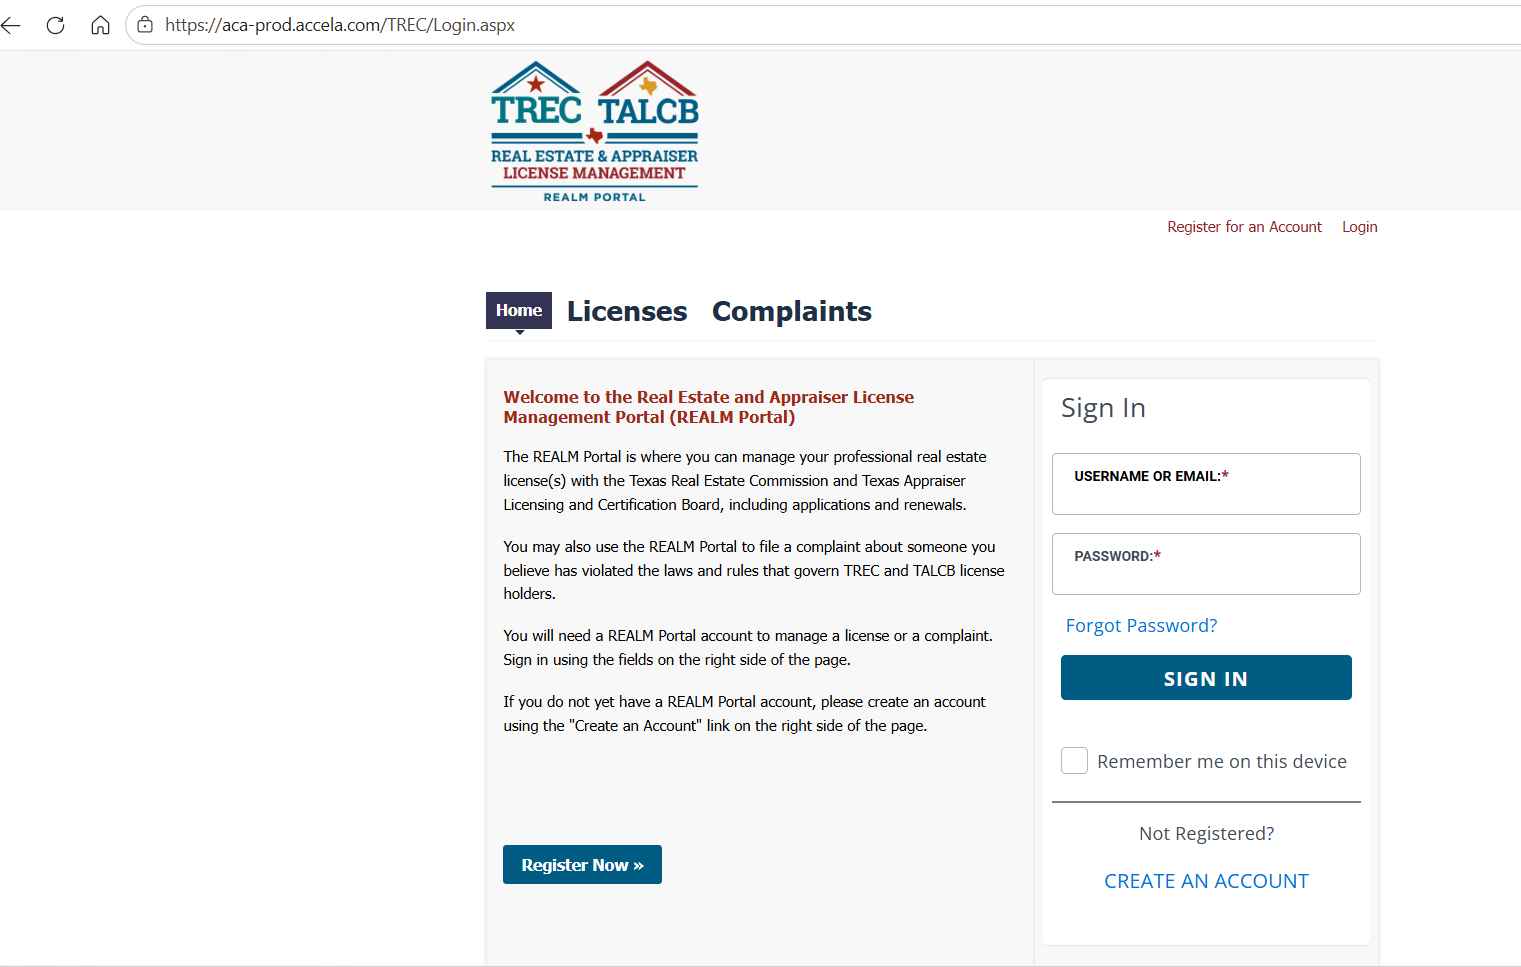
Log in to the TREC REALM Portal with your username and password
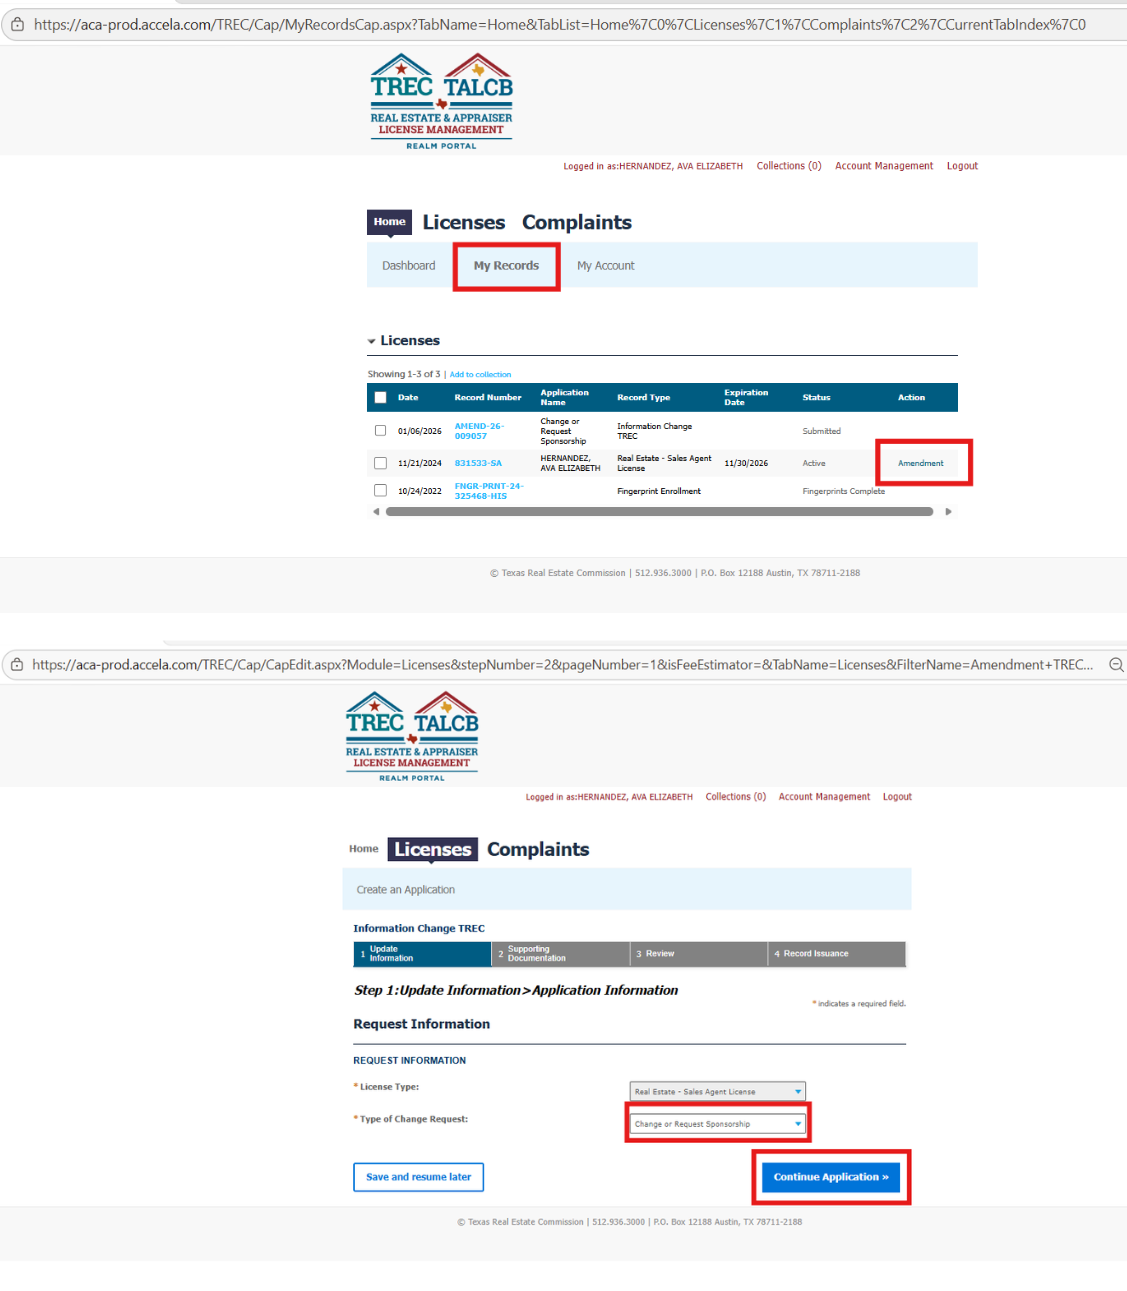
Click My Records, find your active license, and click Amendment
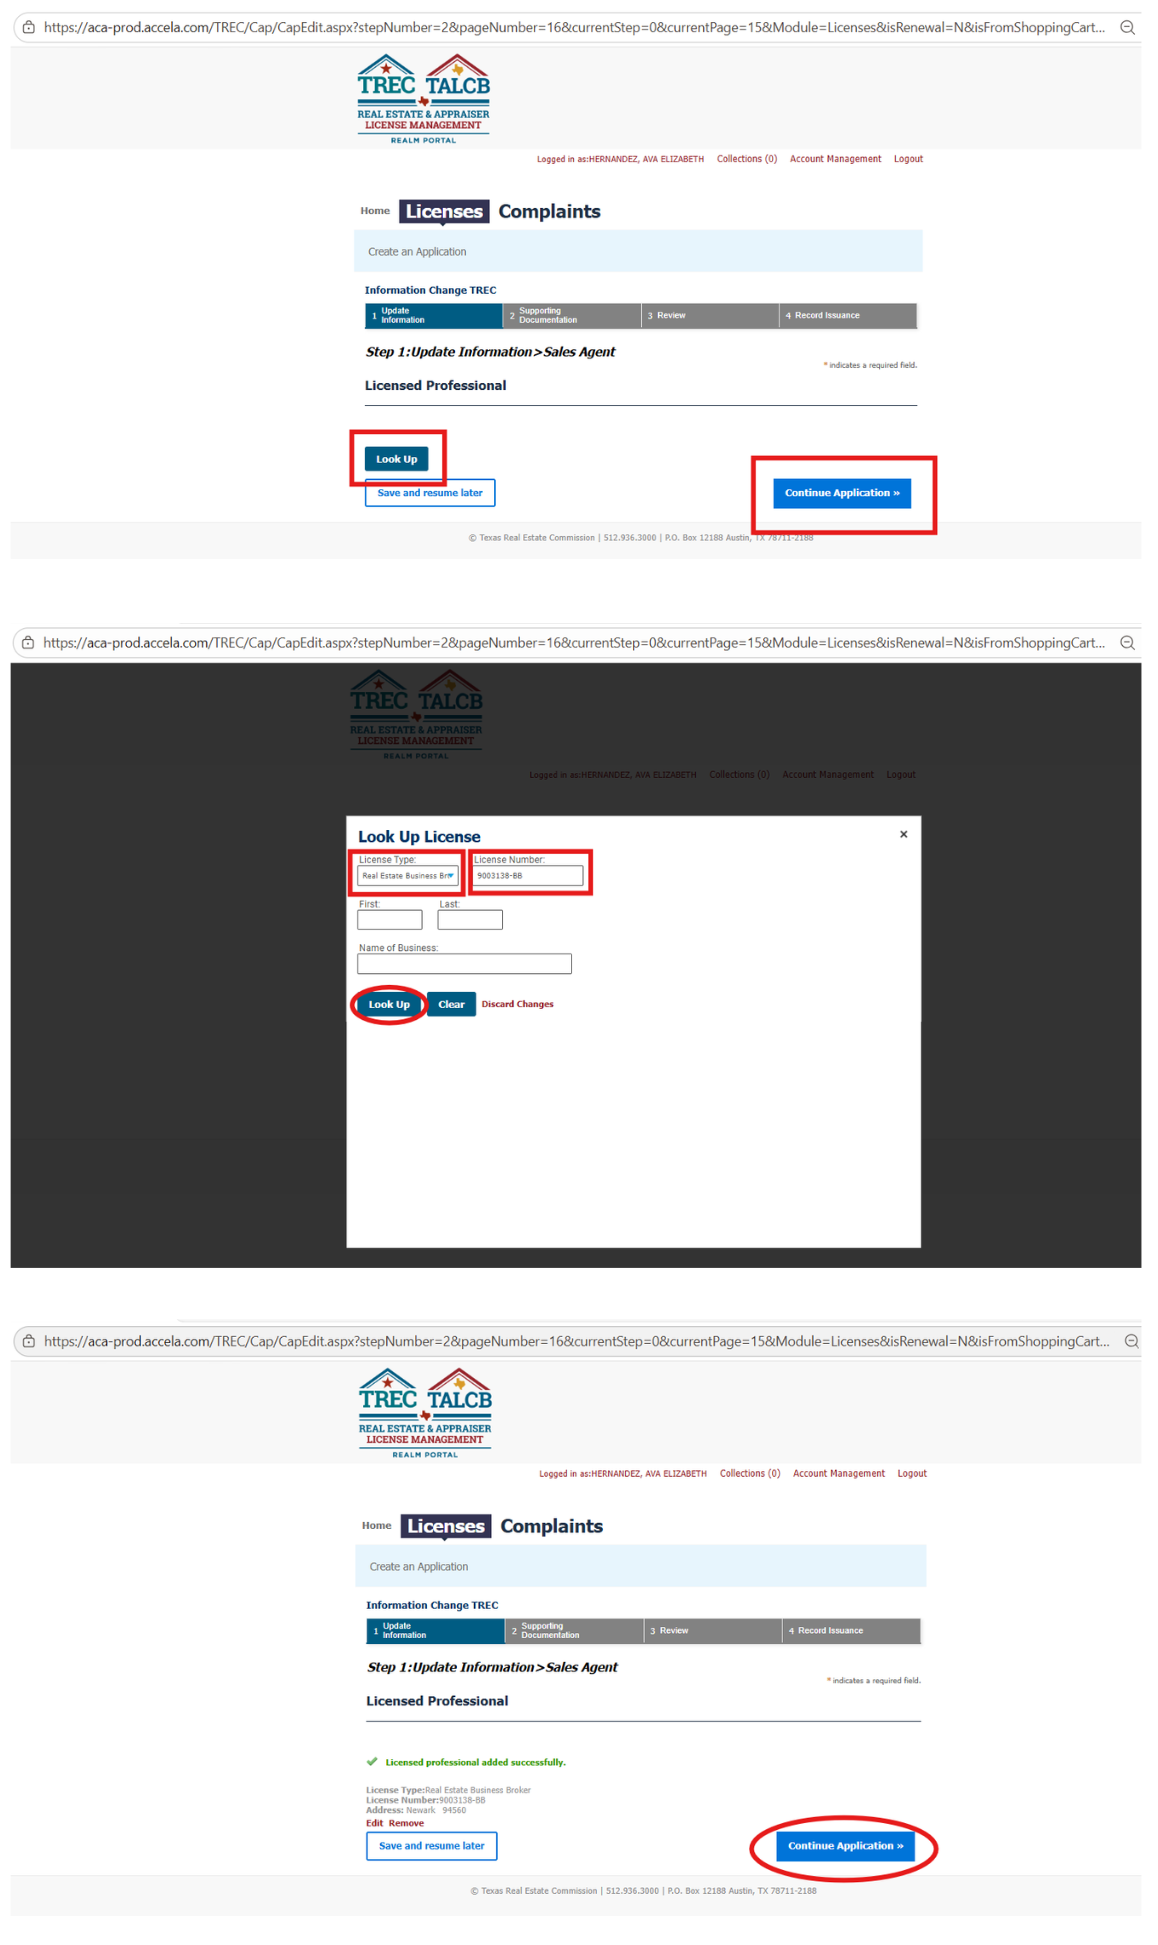
Click Look Up, set License Type to 'Real Estate Business Broker', enter 9003138-BB, and click Look Up
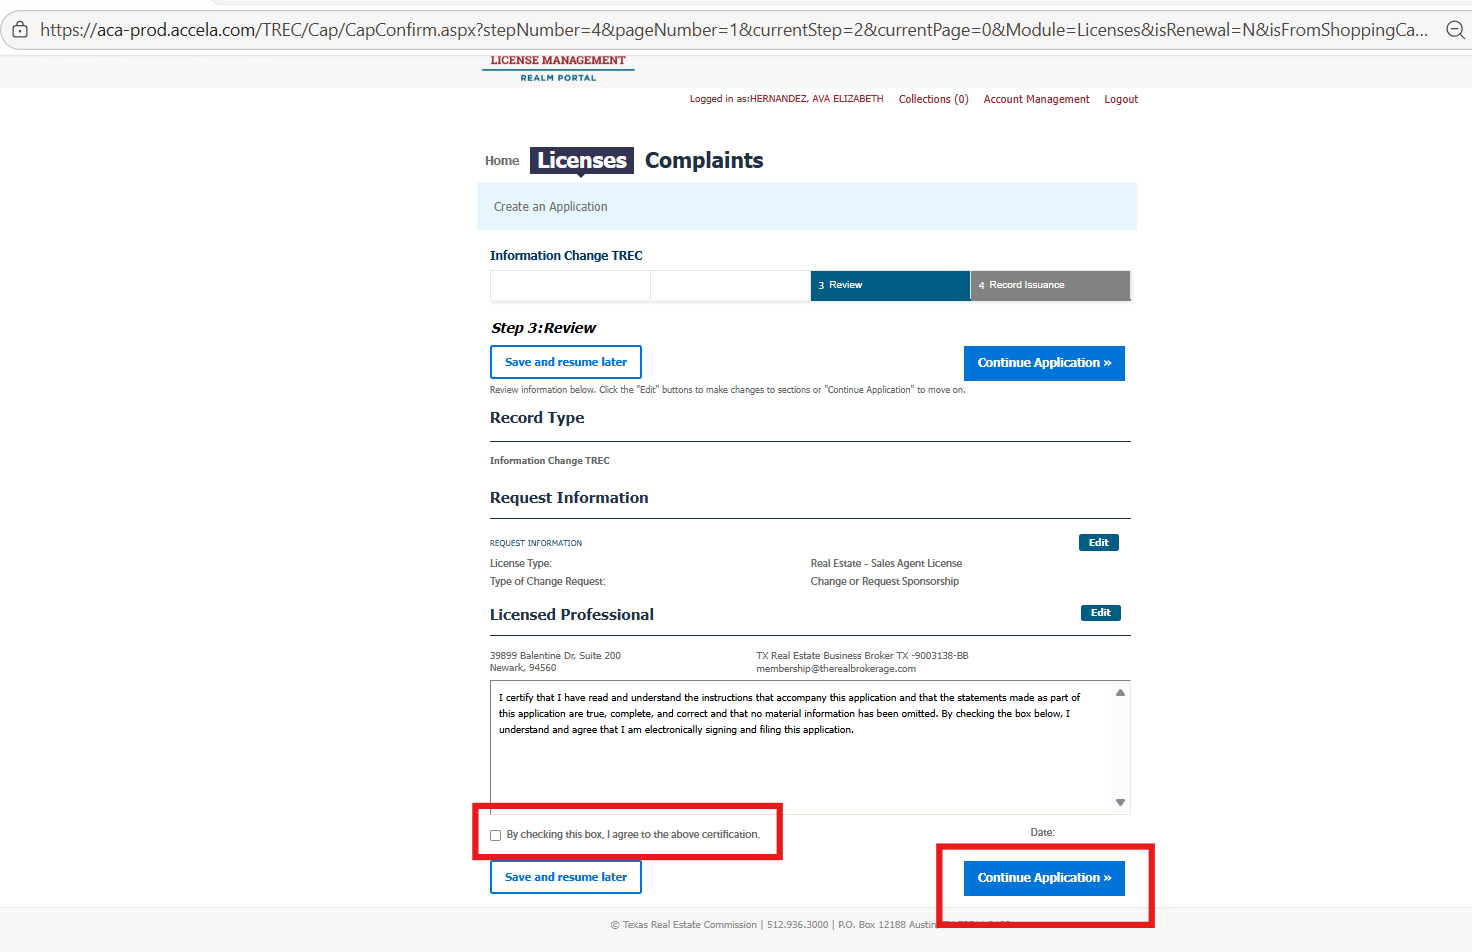
Check the certification box and click Continue Application to submit your transfer
Copy & paste
Hi Real Onboarding Team,

I've submitted my license transfer on TREC REALM to Real Brokerage (broker license 9003138) as of [date]. My TREC license number is [your license number].

Could you confirm that you've received the transfer request on your end?

Thank you,
[Your Name]
Tips
TREC transfers typically process within 1–2 business days, but can take up to 5 days.
If you don't see your license transfer complete after 3 business days, contact Real Onboarding.
Your license must be released by your current broker before you can transfer it on TREC.
Official links
You're done with this step when:
- You logged into TREC REALM and initiated the transfer
- You entered Real's broker license number (9003138) correctly
- You see a confirmation screen on TREC
- You saved a screenshot of the confirmation
Transfer HAR / MLS
Do not delay the HAR transfer — if your listings are not transferred within 30 days, HAR may expire them. Contact HAR immediately if you don't see progress.
Goal
Complete the HAR Transfer Form and Transfer of Listings Form to move your MLS membership and active listings to Real.
Before you start
- Your TREC license transfer is complete (or in progress)
- You have your HAR membership number (on your HAR card or profile)
- If you have active listings: the address and MLS number for each listing
Do this now
- 1Log in to HAR and go to Tools → MLS Tools → Forms Manager. Search for 'Transfer Form' and download it.
- 2Fill in your information: name, HAR username, TREC license number, new firm name (Real Broker, LLC), and new address
- 3Have the designated REALTOR from your new firm (Real) sign the form. For Houston, TX agents, the broker information is: Michael Yarrito, License #491108, Email: txbroker@therealbrokerage.com, Phone: (855) 450-0442. For forms requiring the broker's signature, send them to: txsign@therealbrokerage.com
- 4Email the completed form to: memberservices@har.com and mlsqa@har.com
- 5If you have active listings, also complete the Transfer of Listings Form (see 'Active Listings' section below)
- 6Save copies of both forms for your records
What it looks like
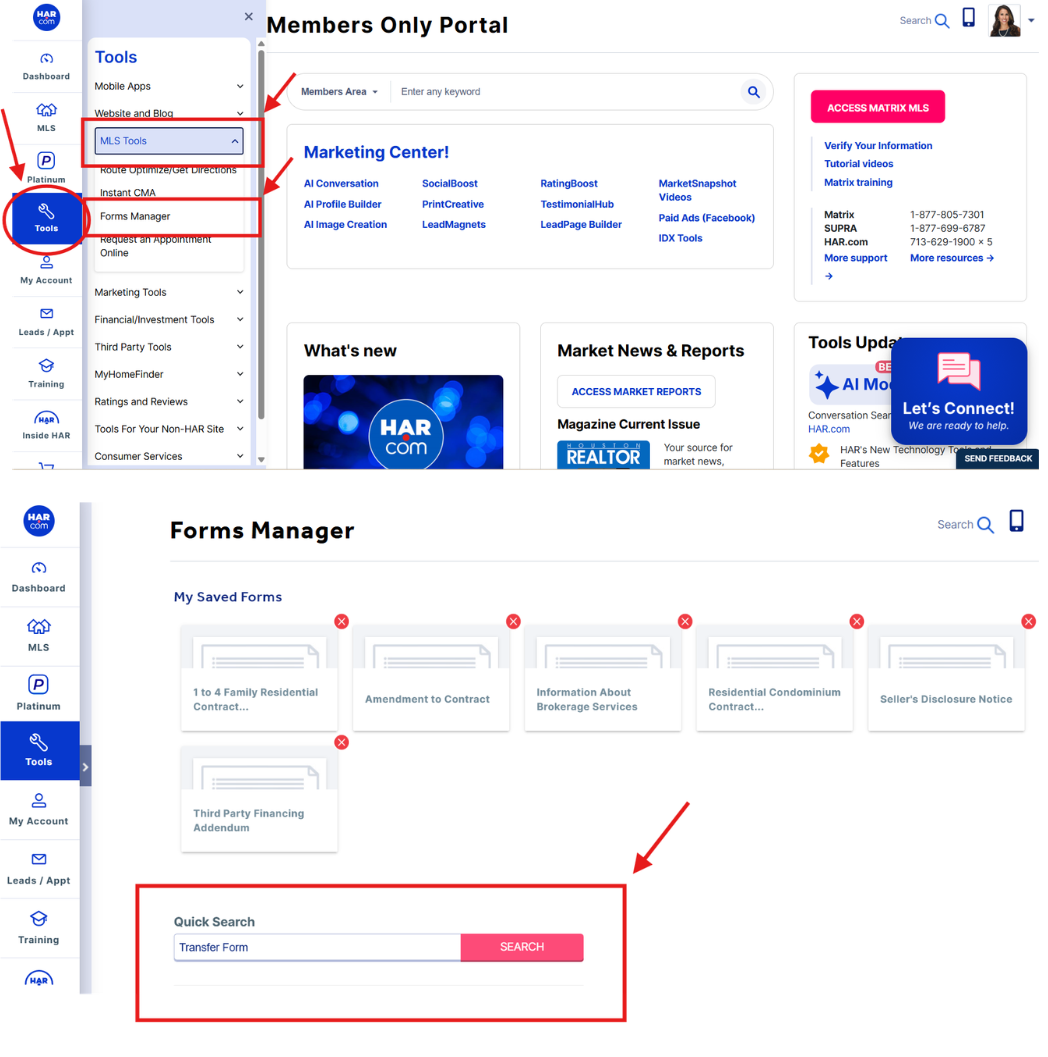
In HAR: go to Tools → MLS Tools → Forms Manager, then search for 'Transfer Form'
HAR Transfer Form — fill in your info and have Real's designated REALTOR sign
Transfer of Listings Form — complete if you have active listings
Copy & paste
Hi HAR Member Services,

Please find attached my completed HAR Transfer Form. I'm transferring my membership to Real Broker, LLC.

My details:
- Name: [Your Name]
- HAR Username: [Your HAR Username]
- TREC License #: [Your License Number]
- New Firm: Real Broker, LLC
- New Address: 5718 Westheimer Rd, Ste 1000, Houston, TX 77057

Please confirm receipt and let me know the next steps.

Thank you,
[Your Name]
If You Have Active Listings
If you do not complete the Transfer of Listings Form, your active listings will remain under your previous broker and you will lose commissions. Contact your previous broker immediately if you have questions.
- 1Download the Transfer of Listings Form (link below)
- 2List each active listing: address, MLS number, and current broker
- 3Confirm the listings will transfer to Real Brokerage
- 4Have your previous broker sign the form (they must authorize the transfer)
- 5Email the completed form to mlsqa@har.com
- 6Real will take over the listings once the transfer is processed
Hi [Previous Broker Name],

I'm transferring to a new brokerage and need your signature on the attached Transfer of Listings Form to move my active listings.

The listings are:
[List each: Address, MLS #, Property Type]

Please sign and return this form so I can submit it to HAR. I appreciate your prompt attention to this.

Thank you,
[Your Name]
Tips
The HAR Transfer Form requires a signature from Real's designated REALTOR. Coordinate with your sponsor or Real Onboarding to arrange this.
HAR typically processes transfers within 3–5 business days.
If you have active listings, you must complete the Transfer of Listings Form or they will not transfer with you.
The $20 HAR change fee is a one-time charge for updating your firm information.
Official links
You're done with this step when:
- You completed the HAR Transfer Form with all required information
- The form was signed by the designated REALTOR from Real
- You emailed the form to memberservices@har.com and mlsqa@har.com
- You received confirmation from HAR
- If applicable: you completed and submitted the Transfer of Listings Form
Set up reZEN
Goal
Log in to reZEN and enter your first transaction. The three guides below walk you through it.
Before you start
- Your Real application is accepted and you have your login credentials
- Your TREC license transfer is complete (Step 3)
- Your HAR/MLS transfer is complete (Step 4)
Do this now
- 1Log in to reZEN at https://bolt.therealbrokerage.com/
- 2Complete your profile: photo, bio, phone, and office location
- 3Decide which guide applies to you: Listing Side (Section A) if you have a listing, Buyer Side (Section B) if you're representing a buyer, or both.
- 4Follow the guide to enter your first transaction
- 5Upload your transaction documents for compliance review (Section C — everyone needs this)
- 6Send a client update email using the template below
Copy & paste
Hi [Client Name],

I wanted to let you know that I've joined Real Brokerage, a forward-thinking national brokerage focused on agent support and technology.

I'm still here to serve you with the same level of care and expertise. My contact info hasn't changed:
- Phone: [Your Phone]
- Email: [Your Email]

If you have any questions or are thinking about buying or selling, I'd love to help.

Best,
[Your Name]
Real Brokerage Agent
Hi [Title Company / Other Agent Name],

I've recently transferred to Real Brokerage. I have a pending contract that needs to be updated with my new brokerage information:

Property: [Address]
MLS#: [Number]
Closing Date: [Date]

New Brokerage Information:
Real Brokerage LLC
Please update your records accordingly. If you need any additional documentation, please let me know.

Thank you,
[Your Name]
Real Brokerage Agent
Which guide do I need?
A. Add a Transaction — Listing Side
Create a listing in reZEN, manage it through the Road to Success checklist, then convert it to a transaction when you go under contract.
Step-by-step
- 1Part 1 — Create a Listing: Click My Listings in the left sidebar, then click + Create Listing in the top right corner.
- 2Enter the property address, unit number, year built, and MLS number. If this is an exclusive listing, enter 'N/A' under MLS#.
- 3Enter the listing price, commission split information, listing date, and expiration date.
- 4Add the seller information and contact info. Click + Add Seller for additional sellers (must match the contract). Click + Duplicate Seller to copy/paste similar info.
- 5Enter the listing owner and any co-agents. If you are on a team or a TC working with another agent, select the agent from the dropdown.
- 6Review all information — make sure listing price and commission splits are correct. Click Create Listing, then confirm in the popup.
- 7Part 2 — Manage Your Listing: Once created, you'll have a digital file with Road to Success, Closing Checklist, and Details tabs.
- 8Click Road to Success to see the steps to finalize your listing. Click Checklist to see all required documents.
- 9When you upload a document, the status changes from Not Started to Pending. Once your Broker approves, it's marked Completed.
- 10Part 3 — Convert Listing to Transaction: Click My Listings, then click the deal you want to place under contract.
- 11Click Mark as In Contract. reZEN will walk you through converting the listing to a transaction — most info copies over automatically.
- 12Enter the transaction type, sale price, commission splits, and acceptance/closing dates. Don't forget to update the sale price from the final executed agreement.
- 13If this is a dual-sided transaction, change the representation type in the dropdown.
- 14Enter buyer information, select the listing owner, and add any co-agents.
- 15Enter the buy-side brokerage info. If the other side is a Real agent, click the Real Agent toggle and search for them. If external, click External Agent.
- 16Enter any referrals or OpCity referrals, allocate the commission, indicate if it's a personal deal, and add any fees/rebates.
- 17Enter Title/Escrow information, review everything, and click Create Transaction.
What it looks like
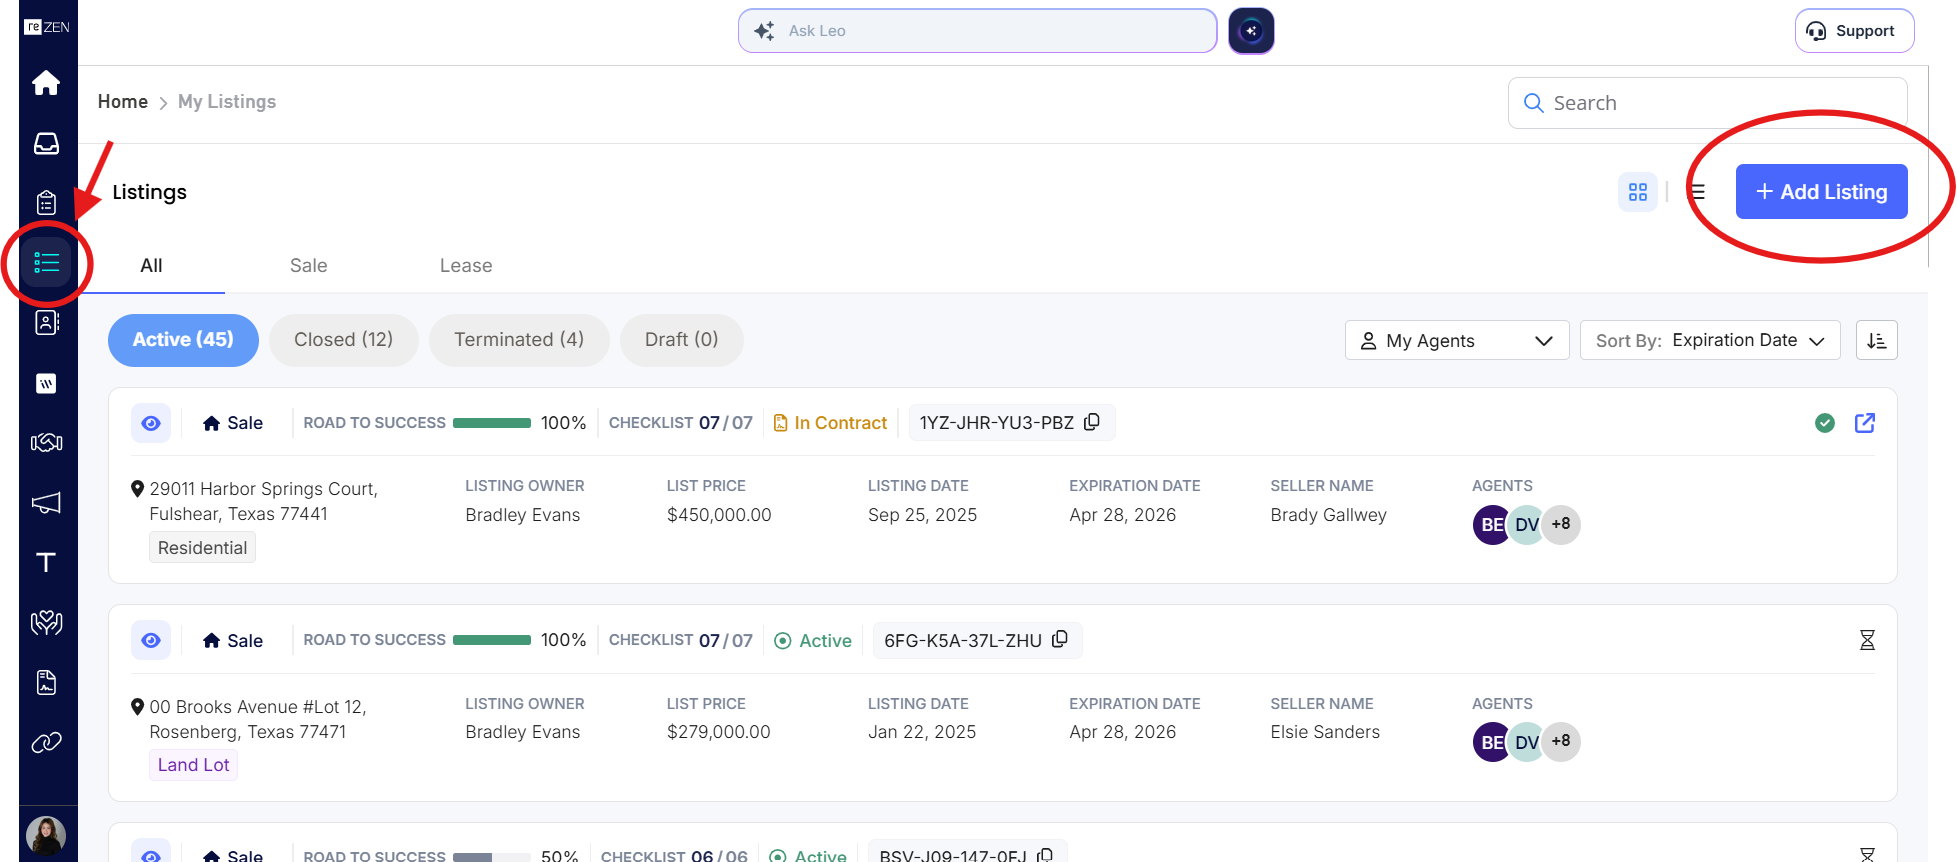
Step 1: Click My Listings in the sidebar, then + Add Listing in the top right
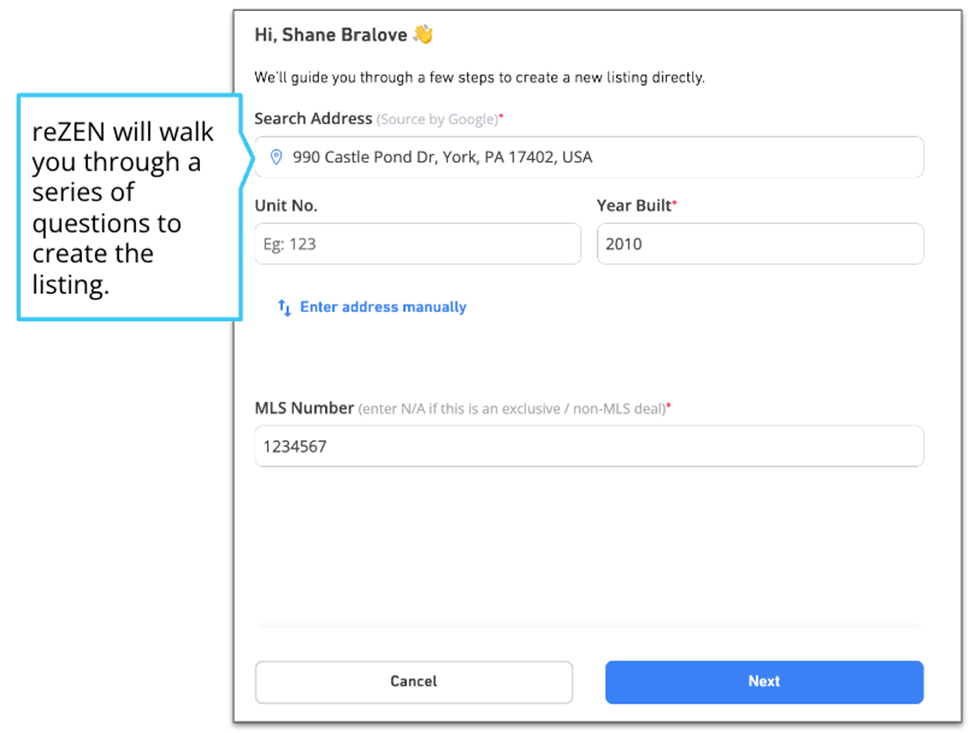
Step 2: Enter property address, unit, year built, and MLS number
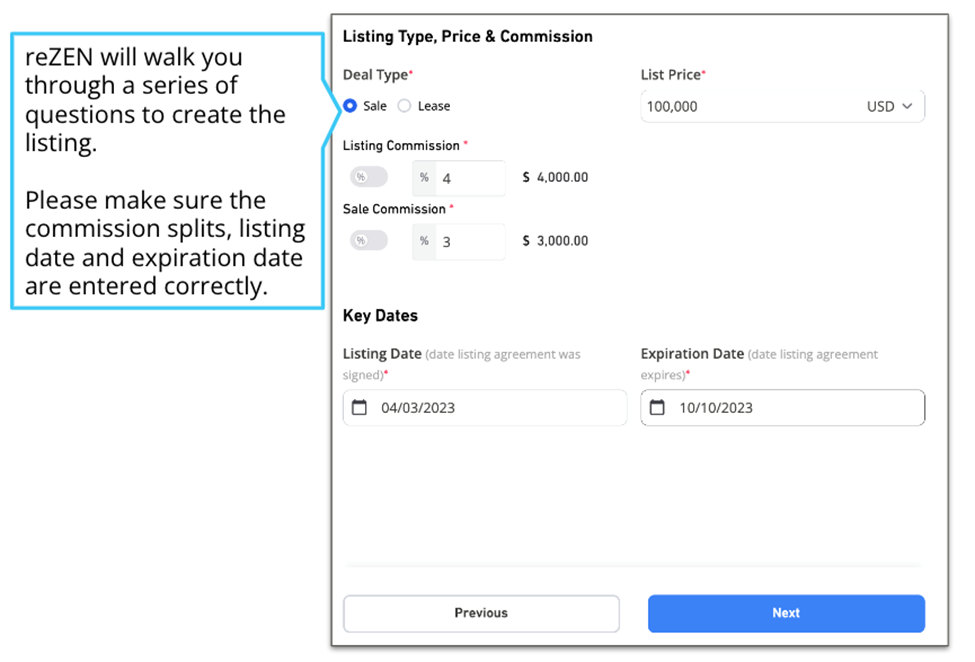
Step 3: Enter listing price, commission splits, and dates
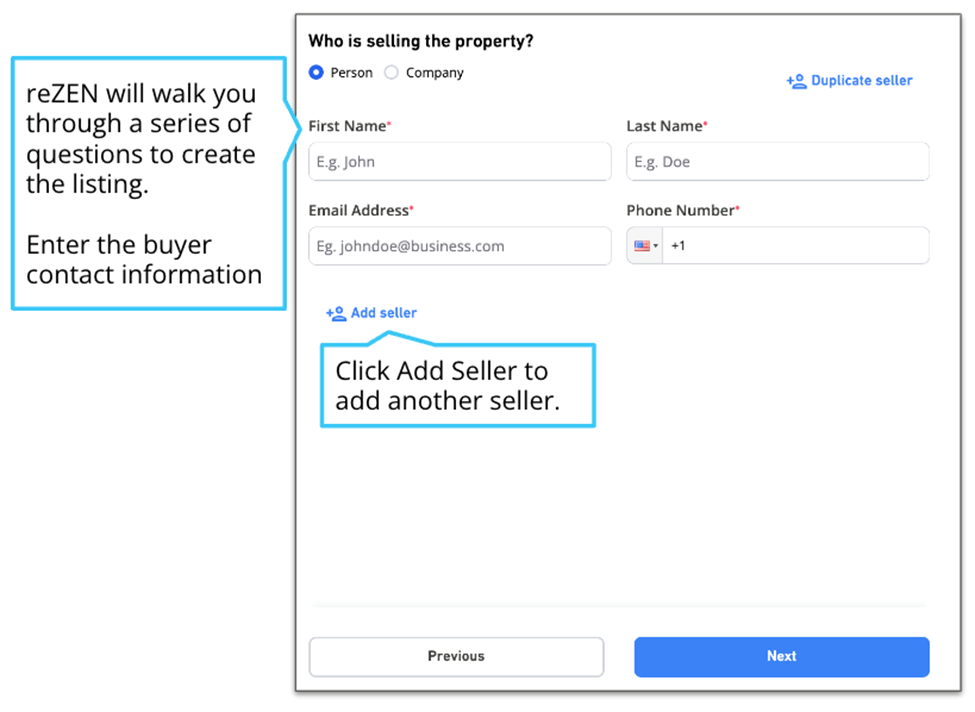
Step 4: Add seller information and contact details
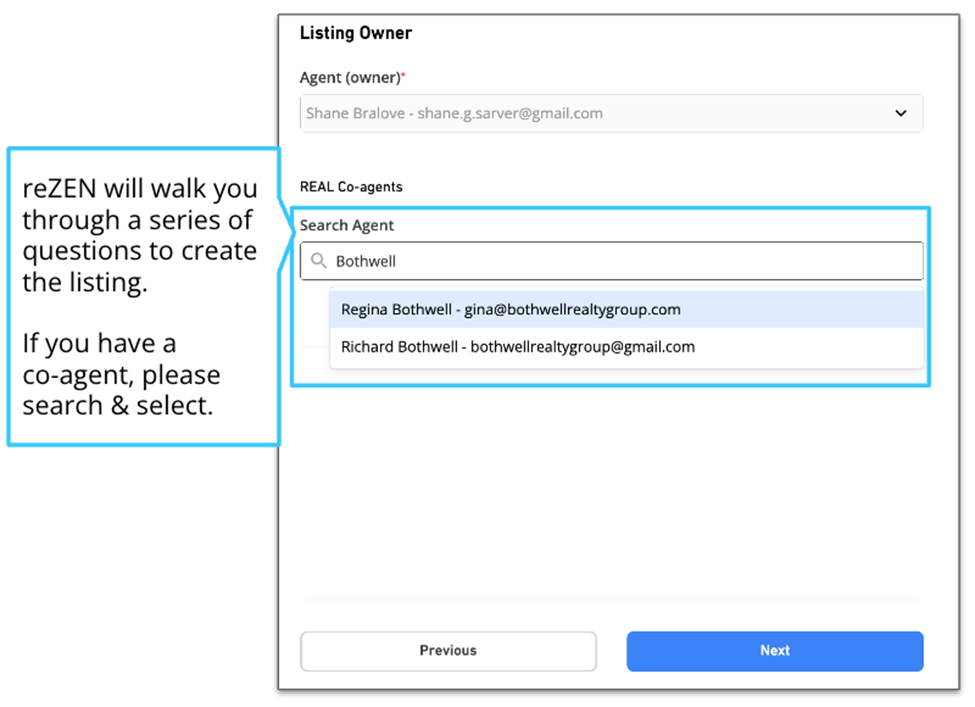
Step 5: Select listing owner and add co-agents
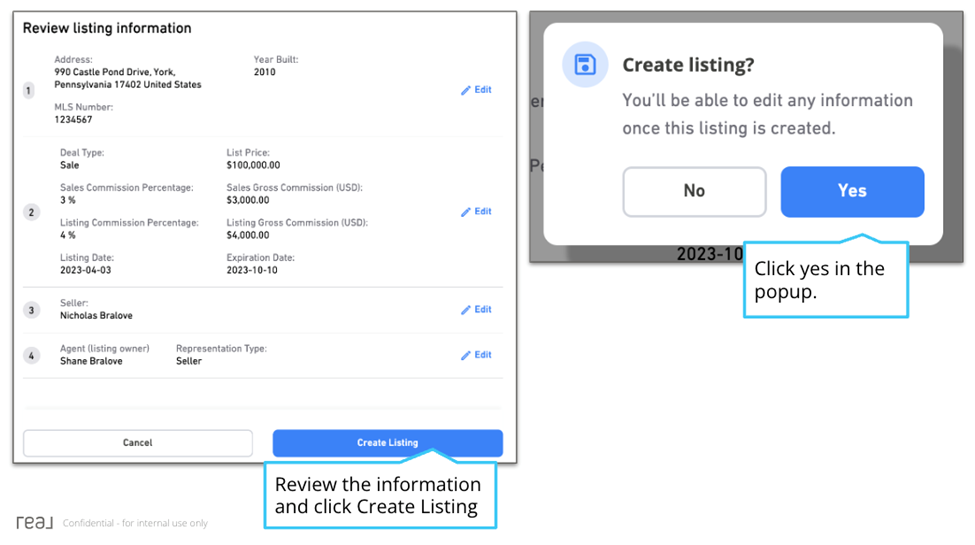
Step 6: Review all info and click Create Listing
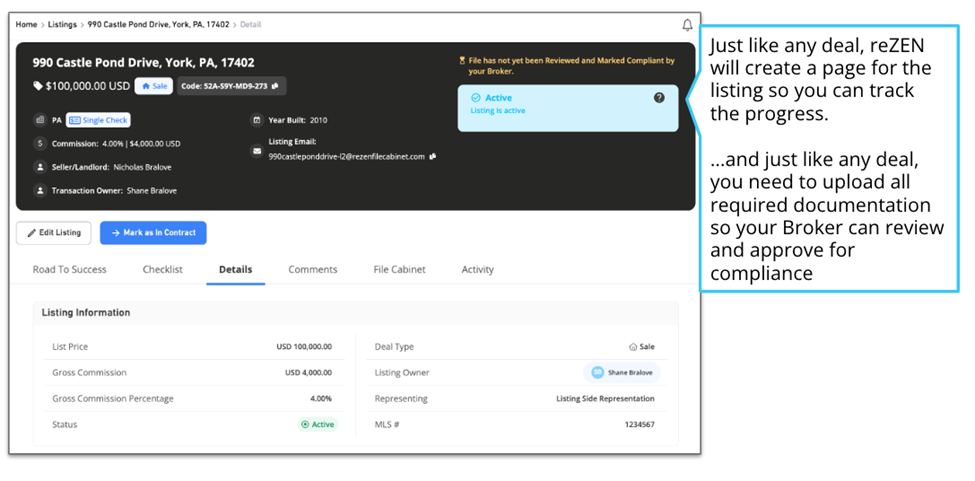
Your listing detail page with Road to Success, Checklist, and Details
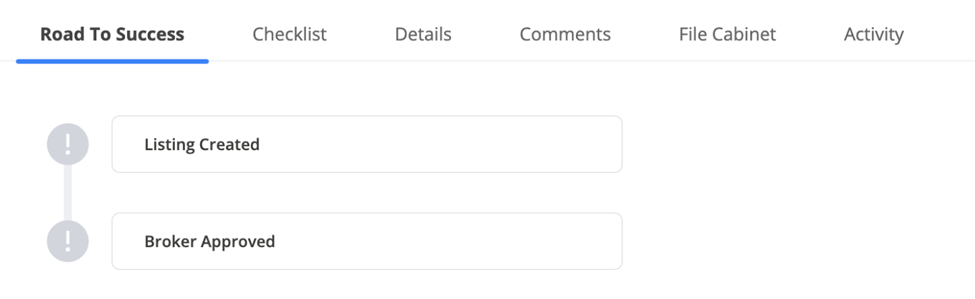
Road to Success shows your progress through the listing lifecycle
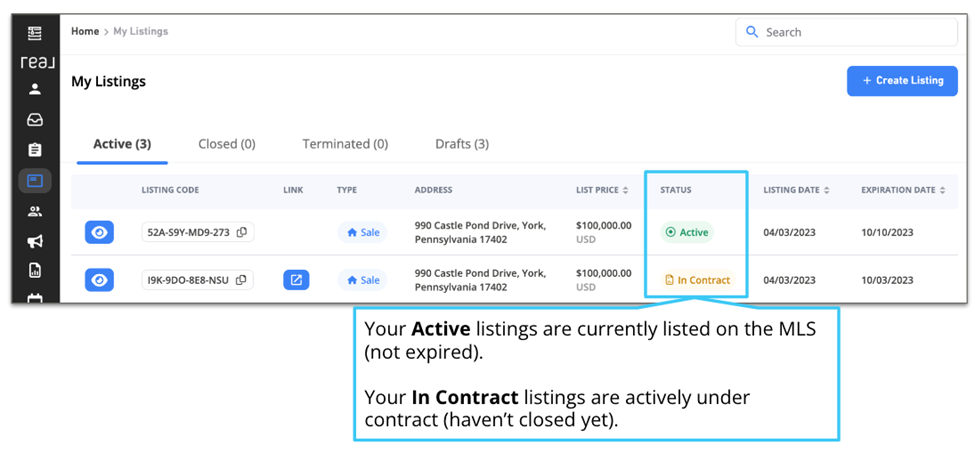
My Listings view showing Active and In Contract statuses
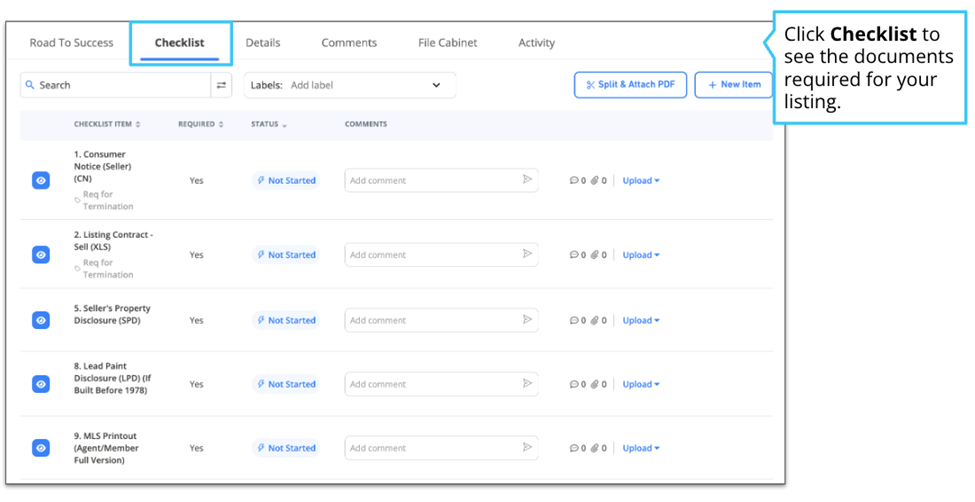
Checklist tab: Not Started → Pending → Completed
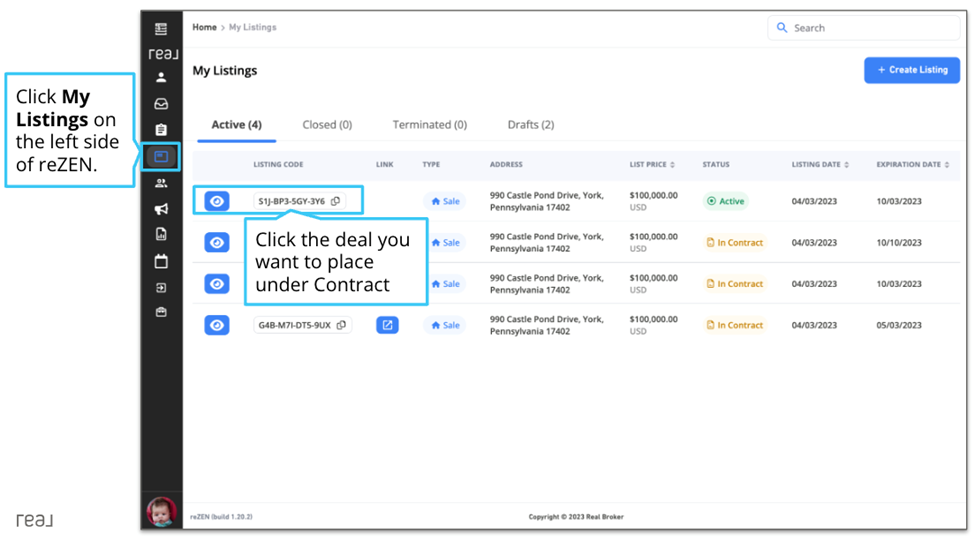
Click the listing you want to place under contract
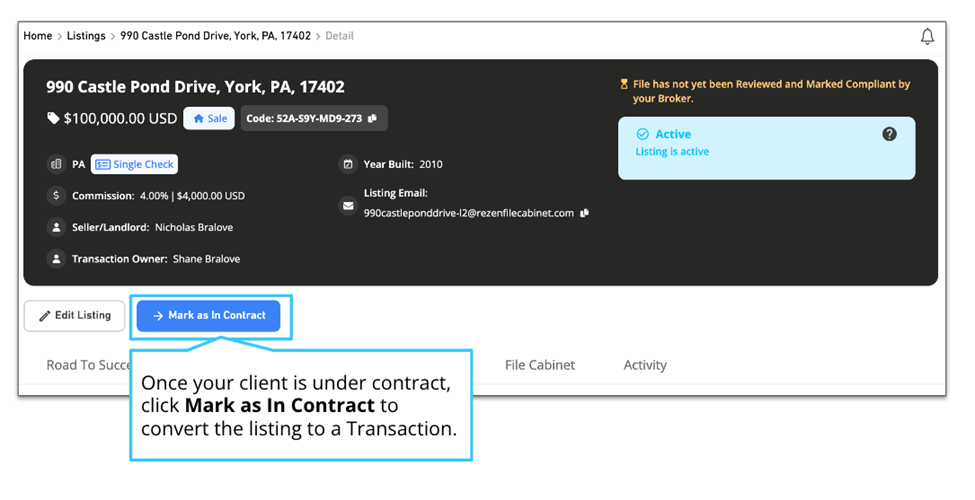
Click Mark as In Contract to start converting
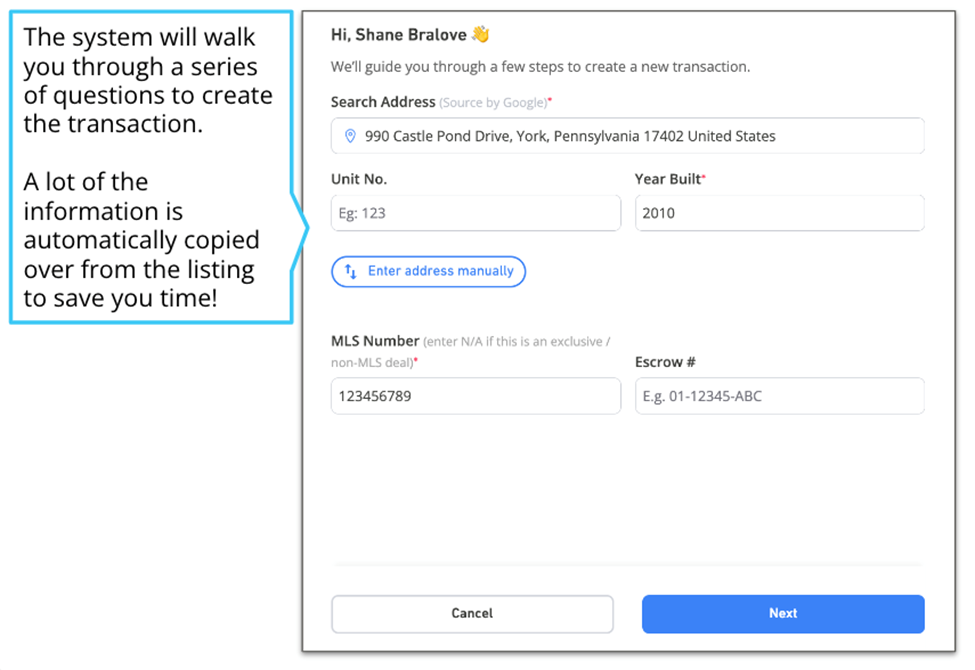
Confirm property details — most info copies from the listing
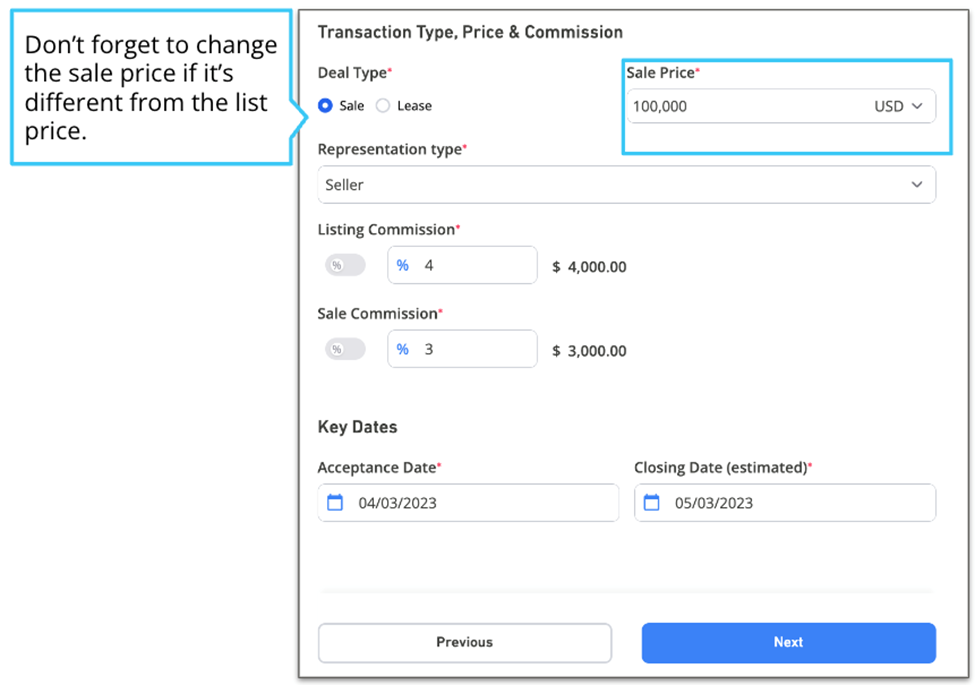
Enter transaction type, sale price, commission, and dates
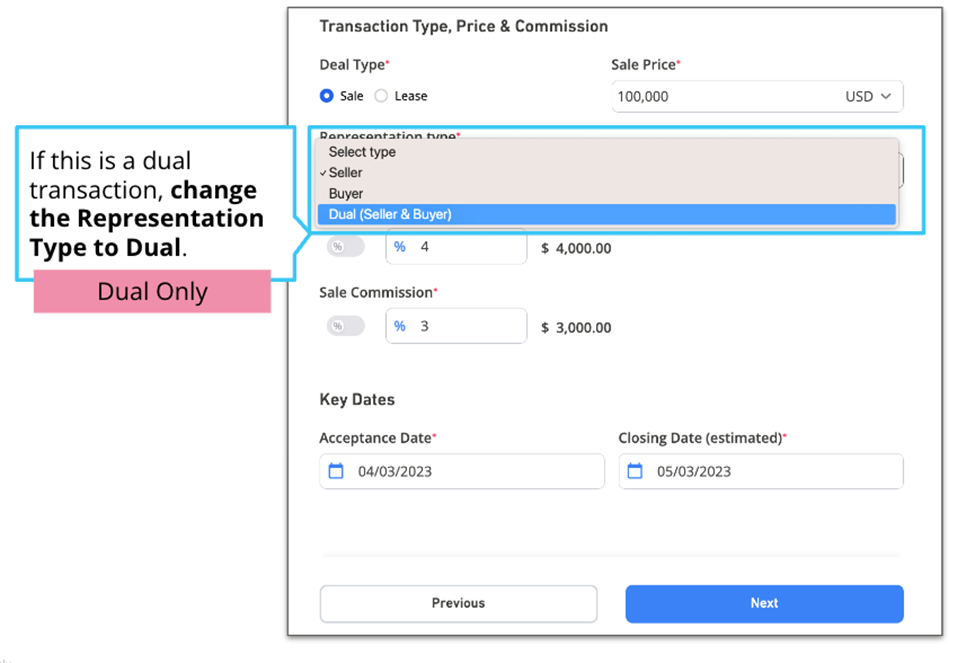
For dual transactions, change the representation type here
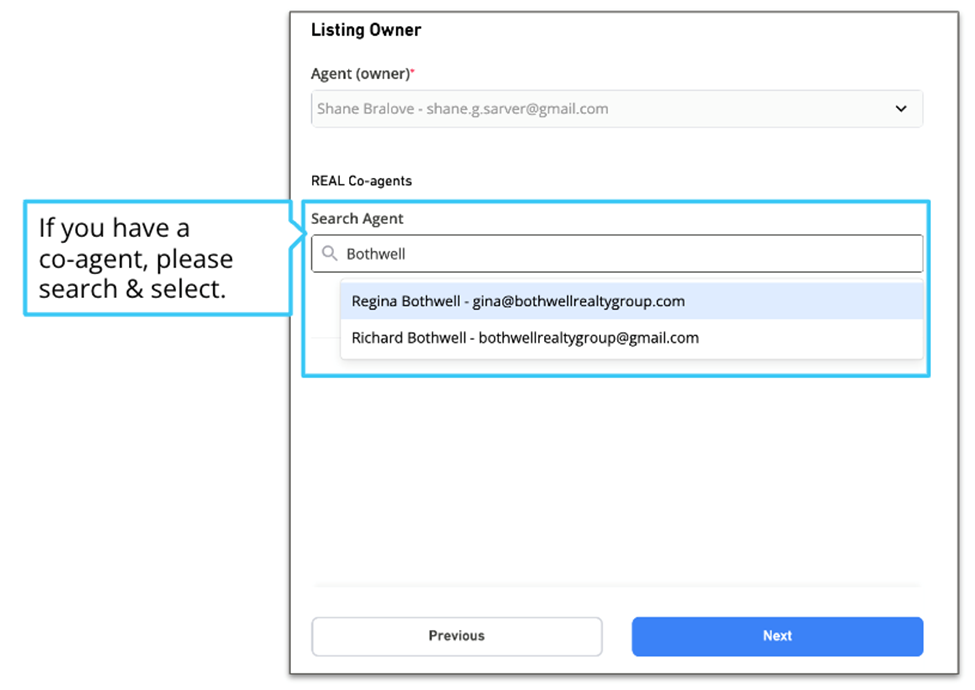
Enter buyer information and select listing owner / co-agents
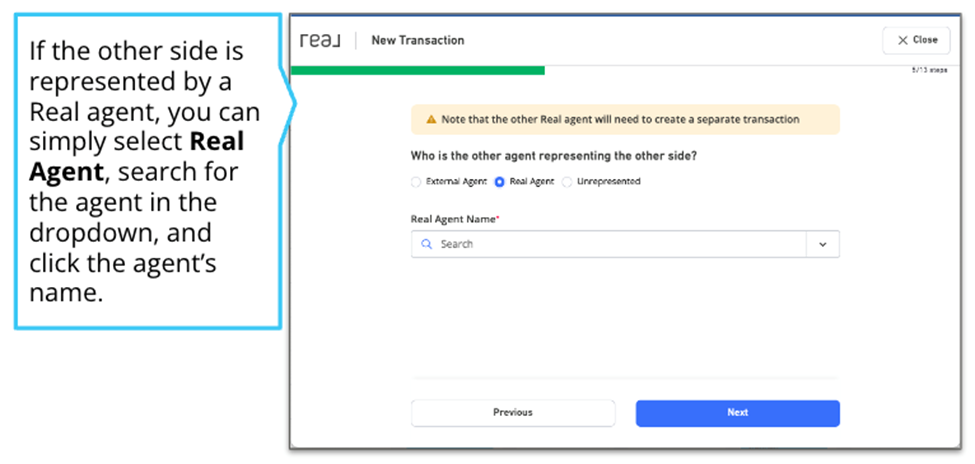
If the other side is a Real agent, click Real Agent and search
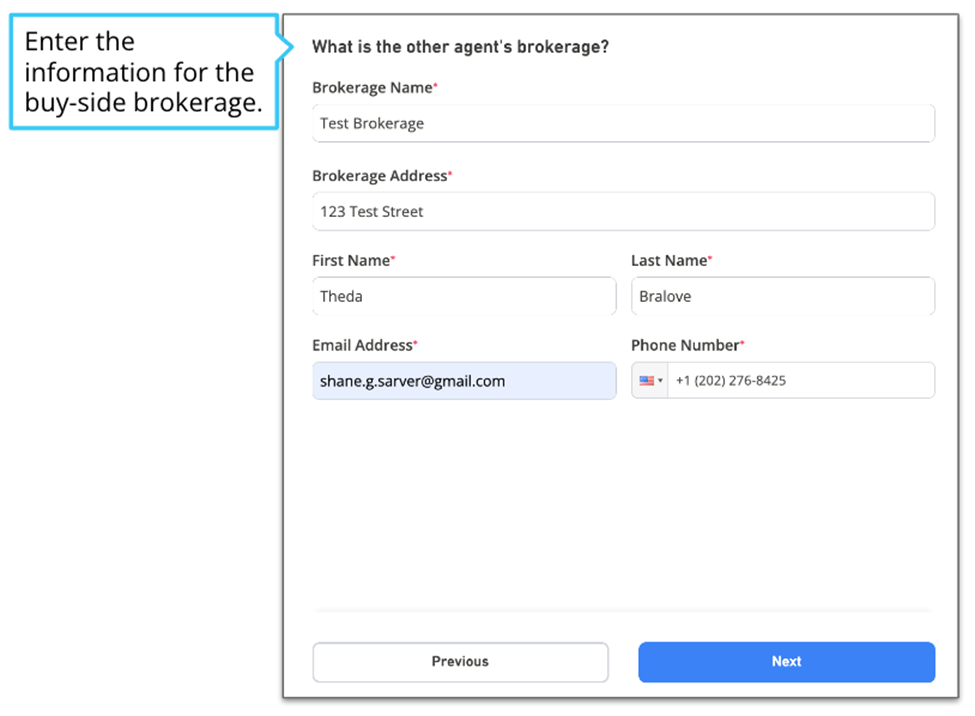
For external agents, enter their brokerage information
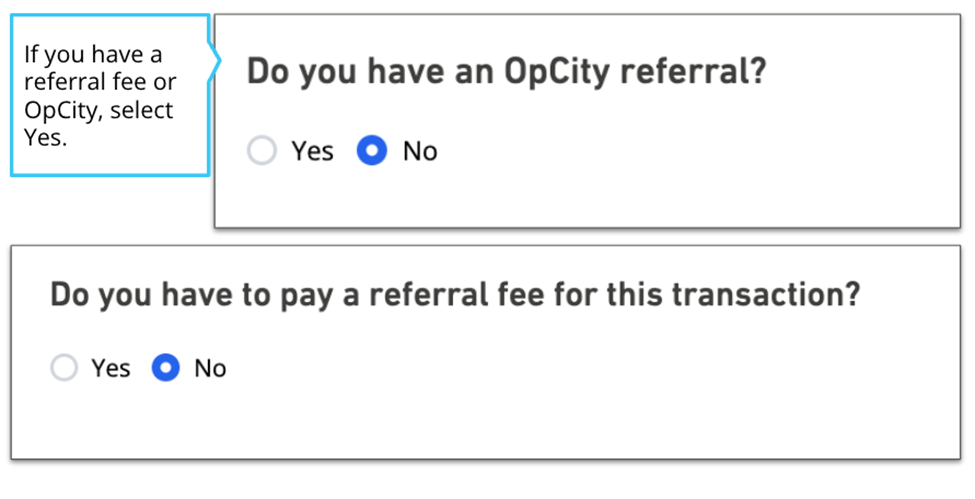
Enter referrals and allocate commission
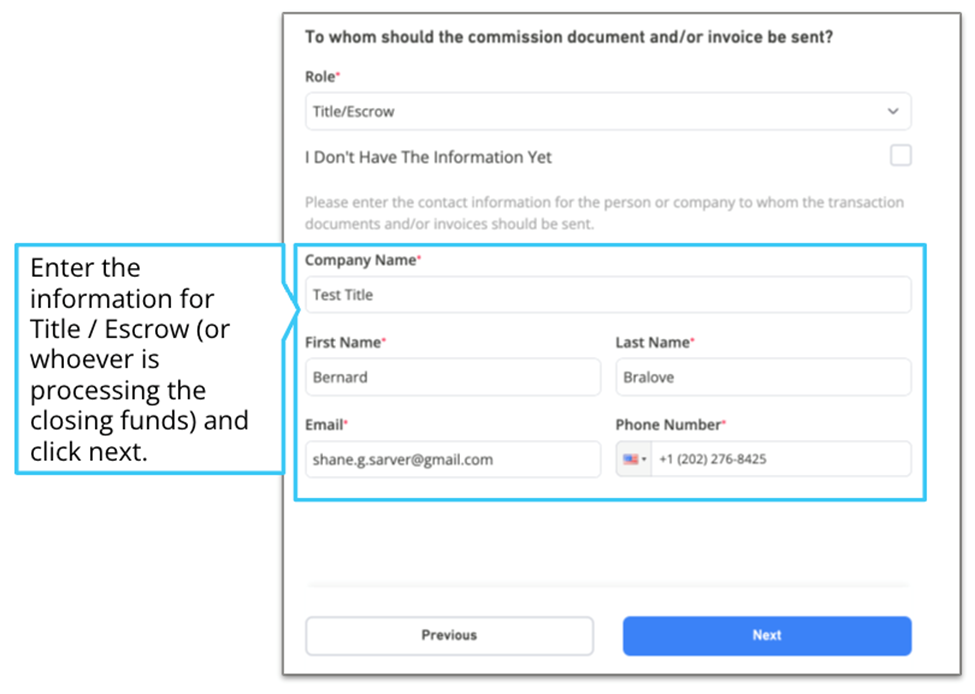
Enter Title/Escrow contact for commission processing
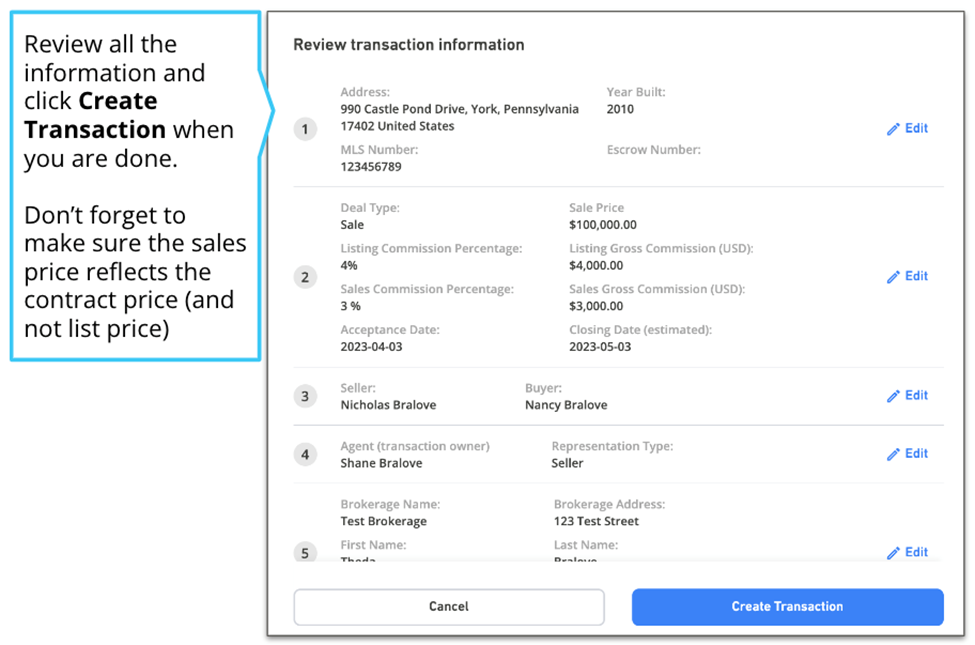
Review everything and click Create Transaction
Tips
By default, reZEN copies the list price when converting to a transaction — don't forget to update it to the actual sale price.
If you have co-agents (team members, referrals), search from the dropdown and add them to the deal.
For dual transactions, you'll skip the buy-side brokerage step since you represent both sides.
Prefer video? Real Academy has a full walkthrough: https://www.real.academy/course/us-get-started-with-transactions
B. Add a Transaction — Buyer Side Only
If you're representing a buyer (not converting from a listing), create a transaction directly from My Transactions.
Step-by-step
- 1Log in to reZEN. Click My Transactions on the left sidebar, then click + Create Transaction in the top right corner.
- 2Enter the property address and MLS number, then click Next.
- 3Enter the deal type, sale price, listing commission, sale commission, acceptance date, and closing date.
- 4Enter the buyer and seller contact information.
- 5Add any co-agents or team members. If you're entering this on behalf of a team member, select the transaction owner from the top dropdown.
- 6Enter the other side's brokerage info. If they're a Real agent, click Real Agent and search. If external, enter their brokerage details.
- 7Enter any referrals or OpCity referrals if applicable.
- 8Allocate the commission. If you're the only agent, enter 100%. If there are co-agents, allocate according to your agreement.
- 9Indicate if this is a personal deal. Enter any fees, rebates, or reimbursements.
- 10Enter Title/Escrow information for commission processing.
- 11Review all information and click Create Transaction.
What it looks like
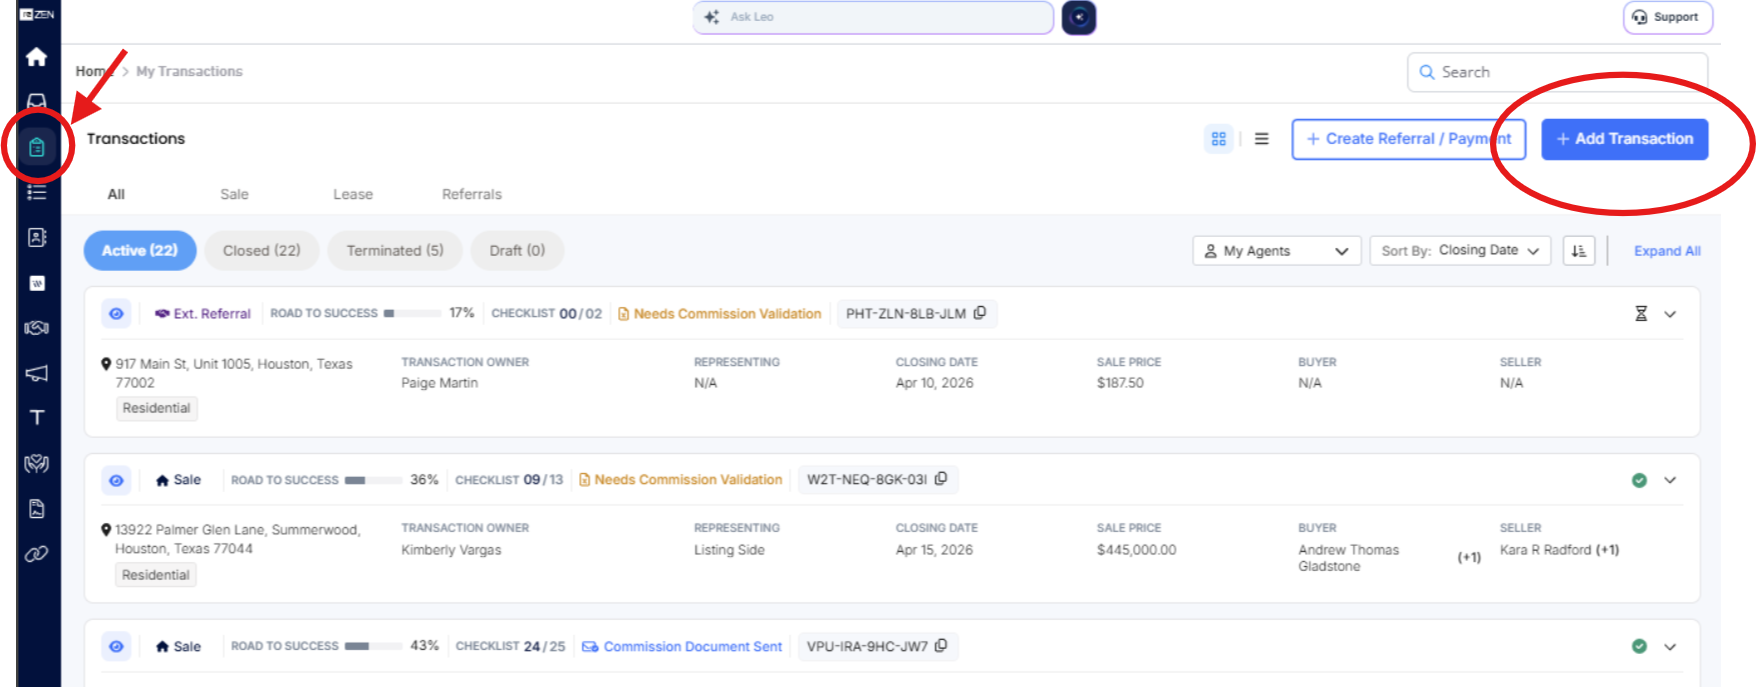
Click My Transactions in the sidebar, then + Add Transaction in the top right
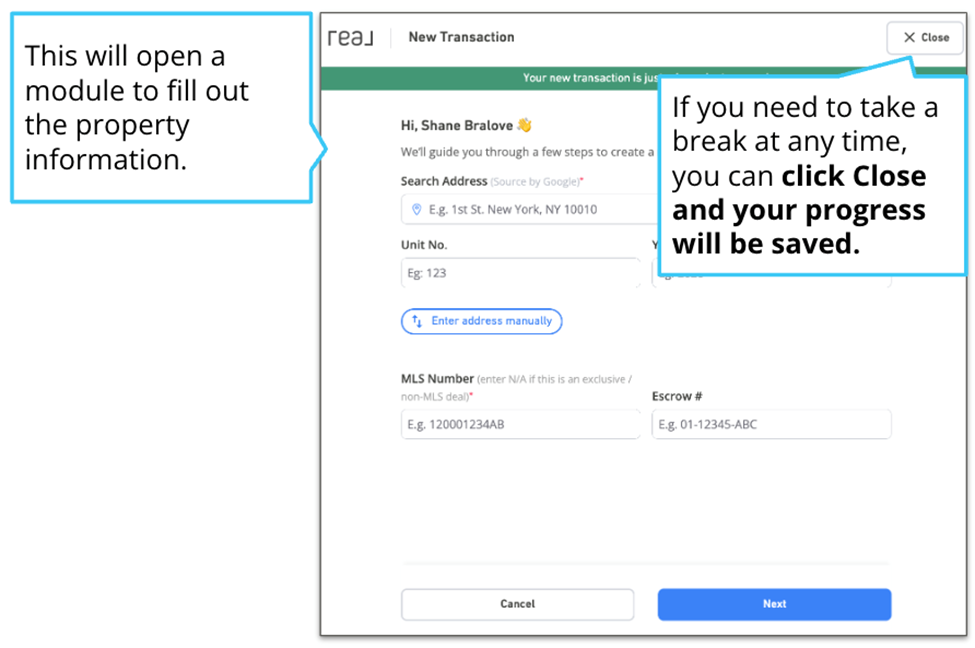
Enter property address and MLS number
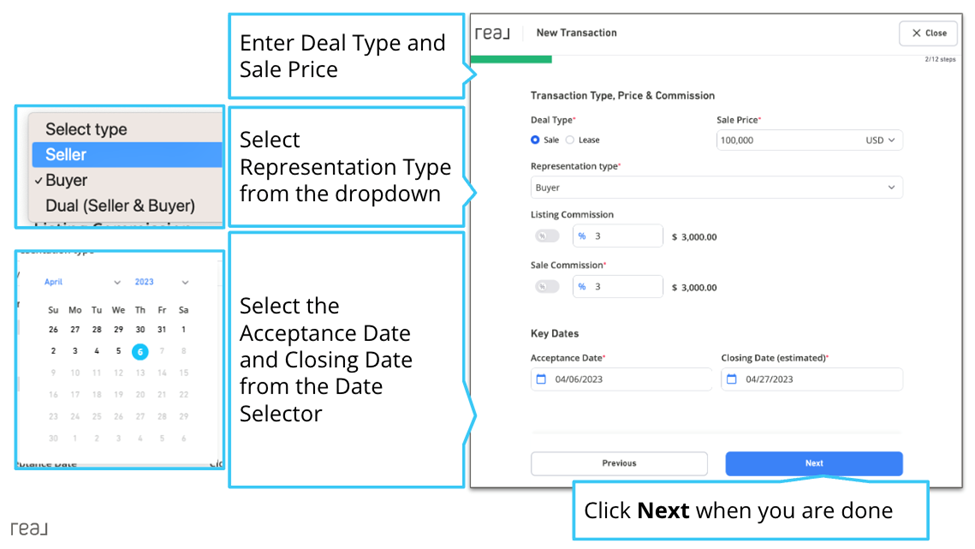
Enter deal type, sale price, commissions, and dates
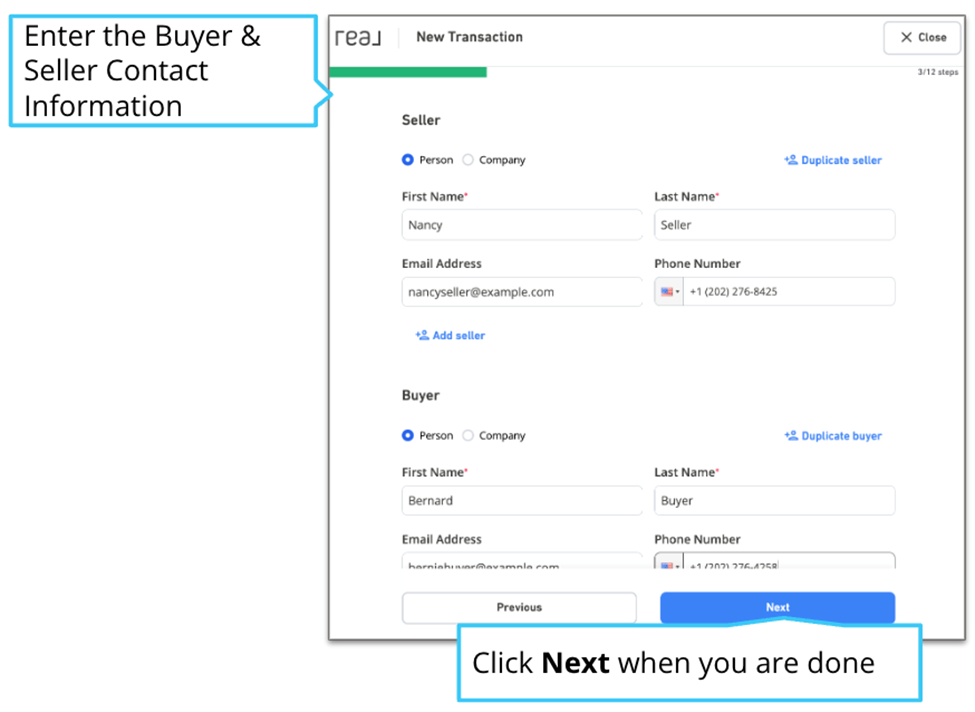
Enter buyer and seller contact information
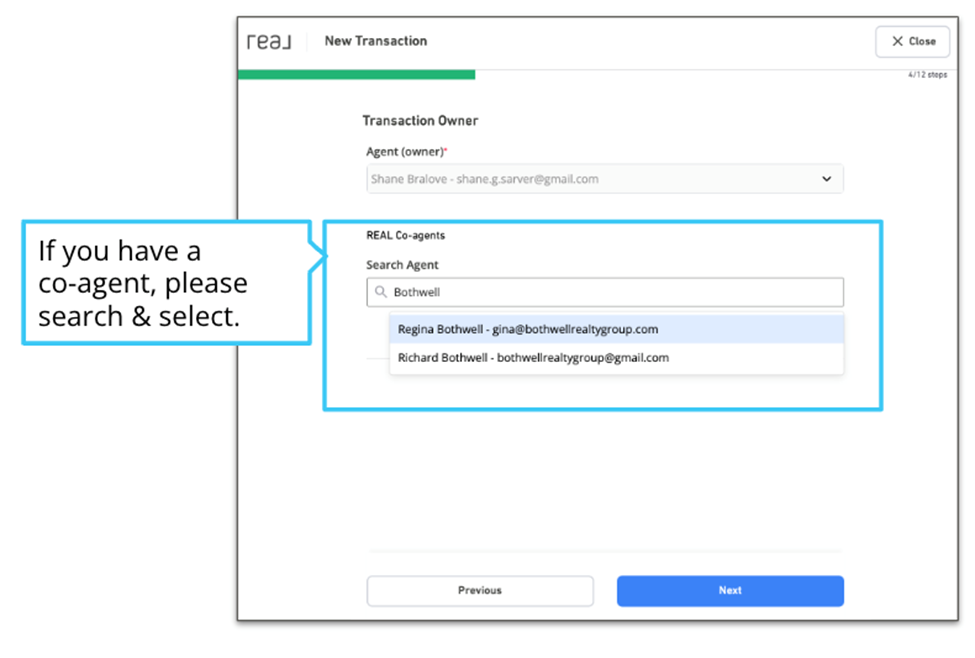
Add co-agents or select the transaction owner
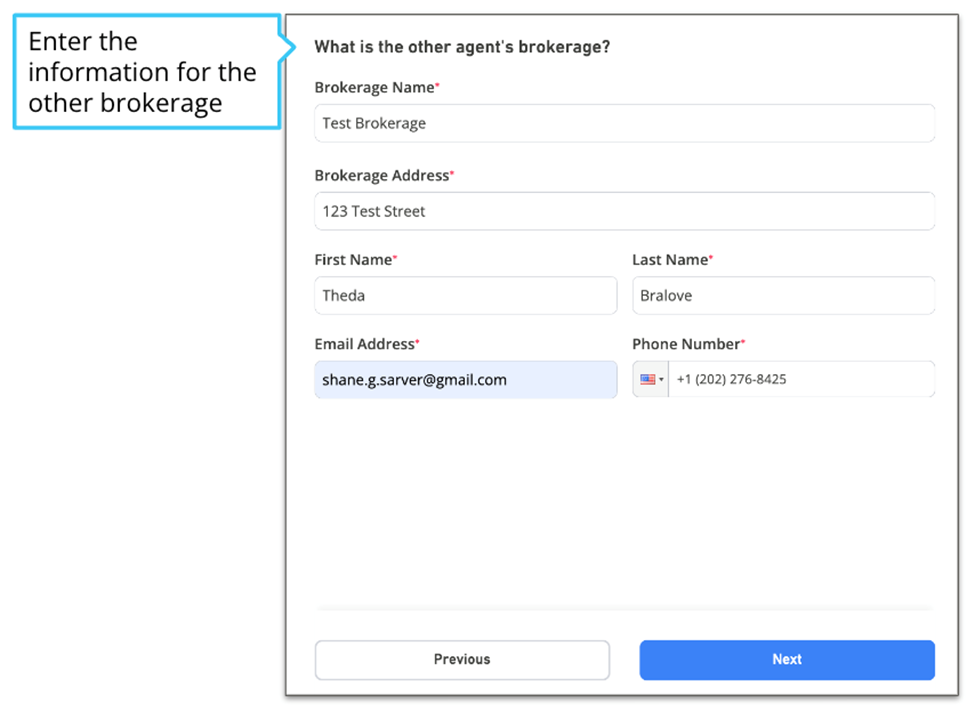
Enter the other side's brokerage — Real Agent or External
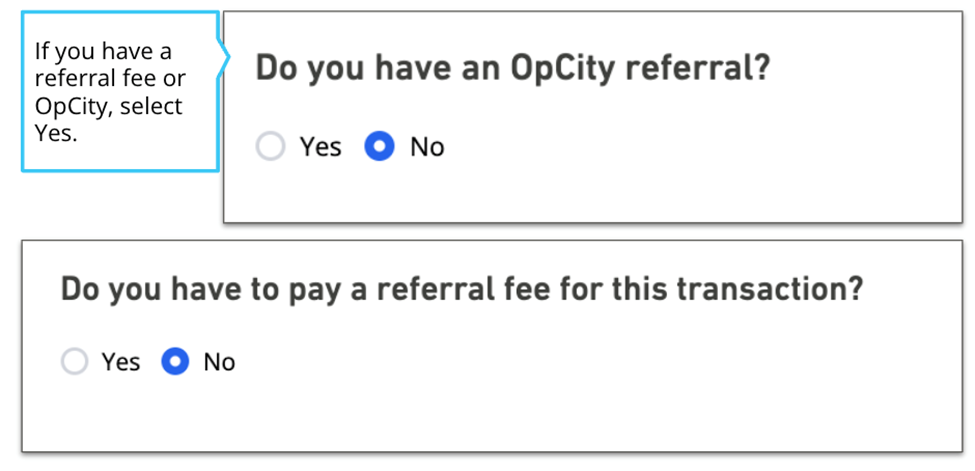
Enter referral or OpCity referral information
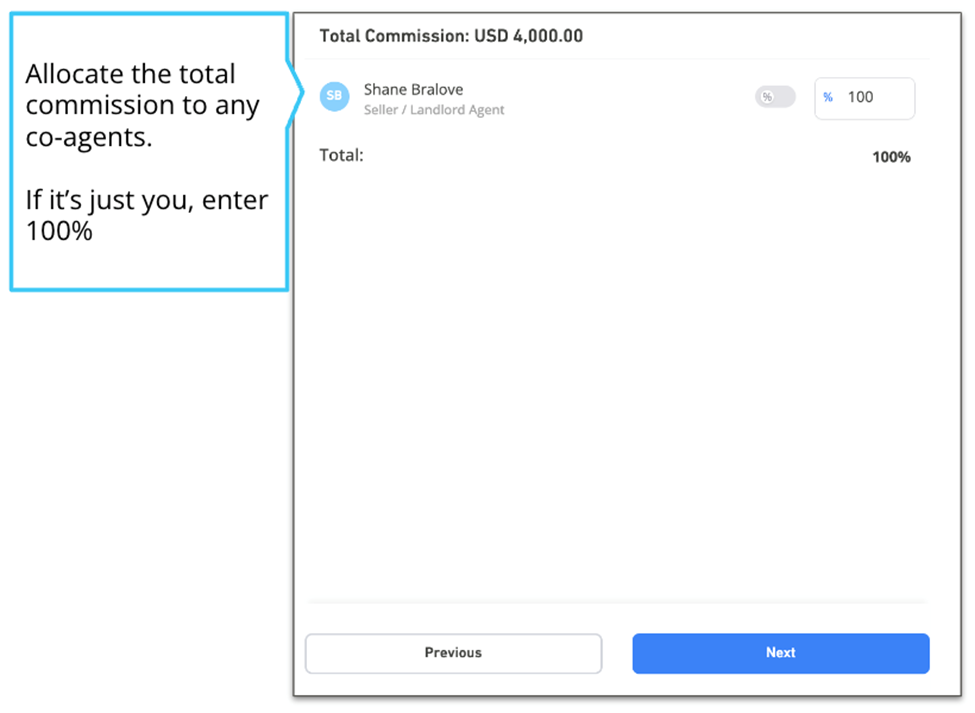
Allocate commission — 100% if you're the only agent
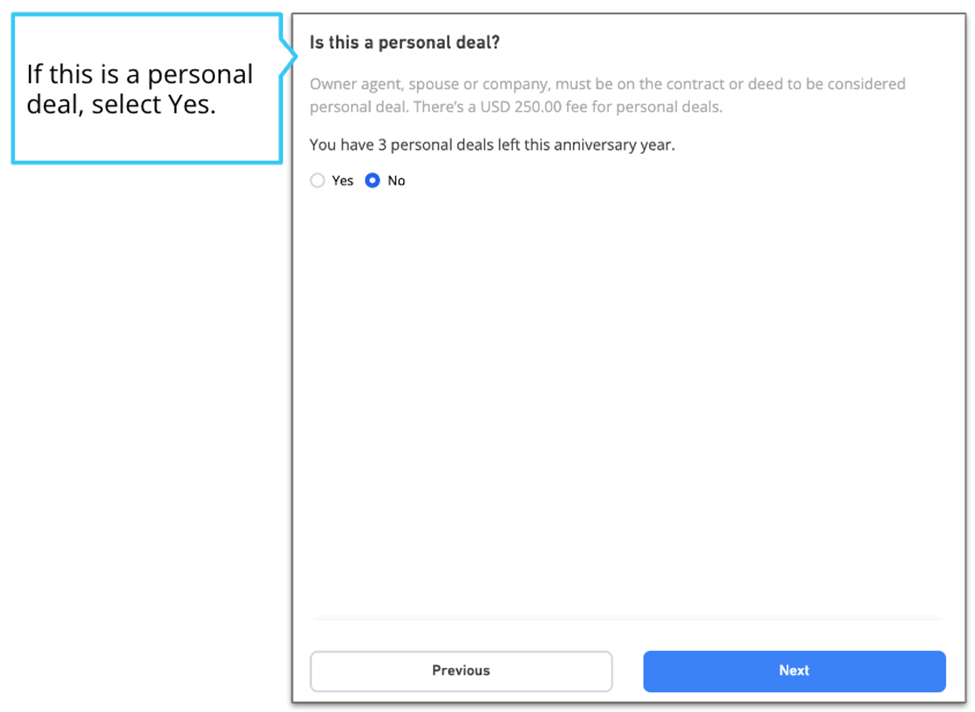
Indicate personal deal status and enter any fees/rebates
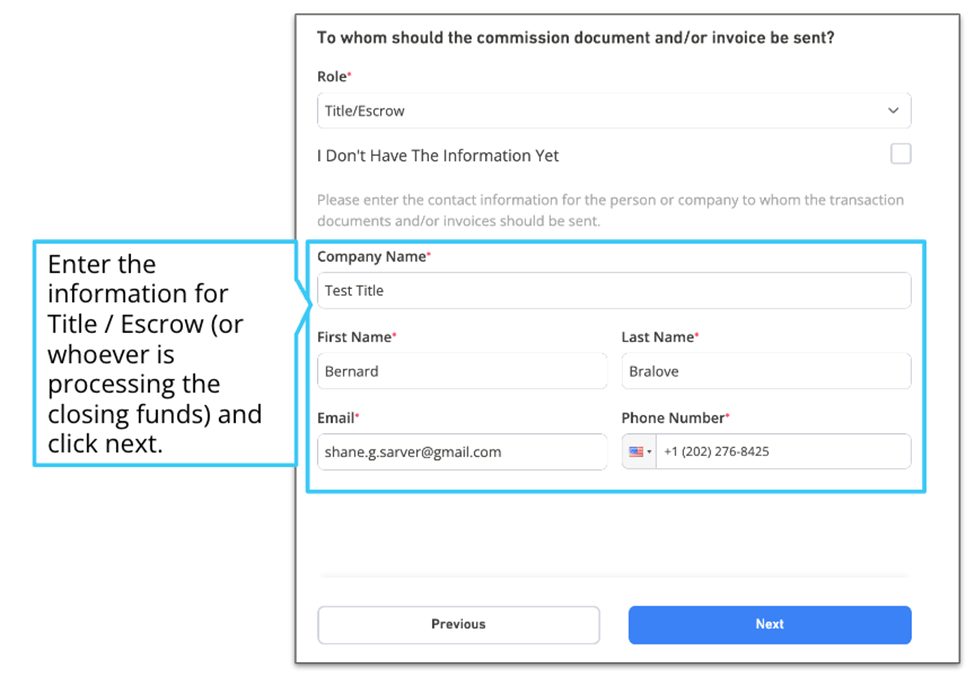
Enter Title/Escrow contact for commission processing
Tips
Adding the other Real agent to your transaction saves time — our team can process it faster when both sides are linked.
If another agent referred business to you, skip the co-agents step and add them as a referral instead.
Prefer video? Real Academy has a full walkthrough: https://www.real.academy/course/us-get-started-with-transactions
C. Upload Documents for Compliance
Every transaction has a checklist of required documents. Upload them so your Broker can review and approve. You have several upload methods.
Step-by-step
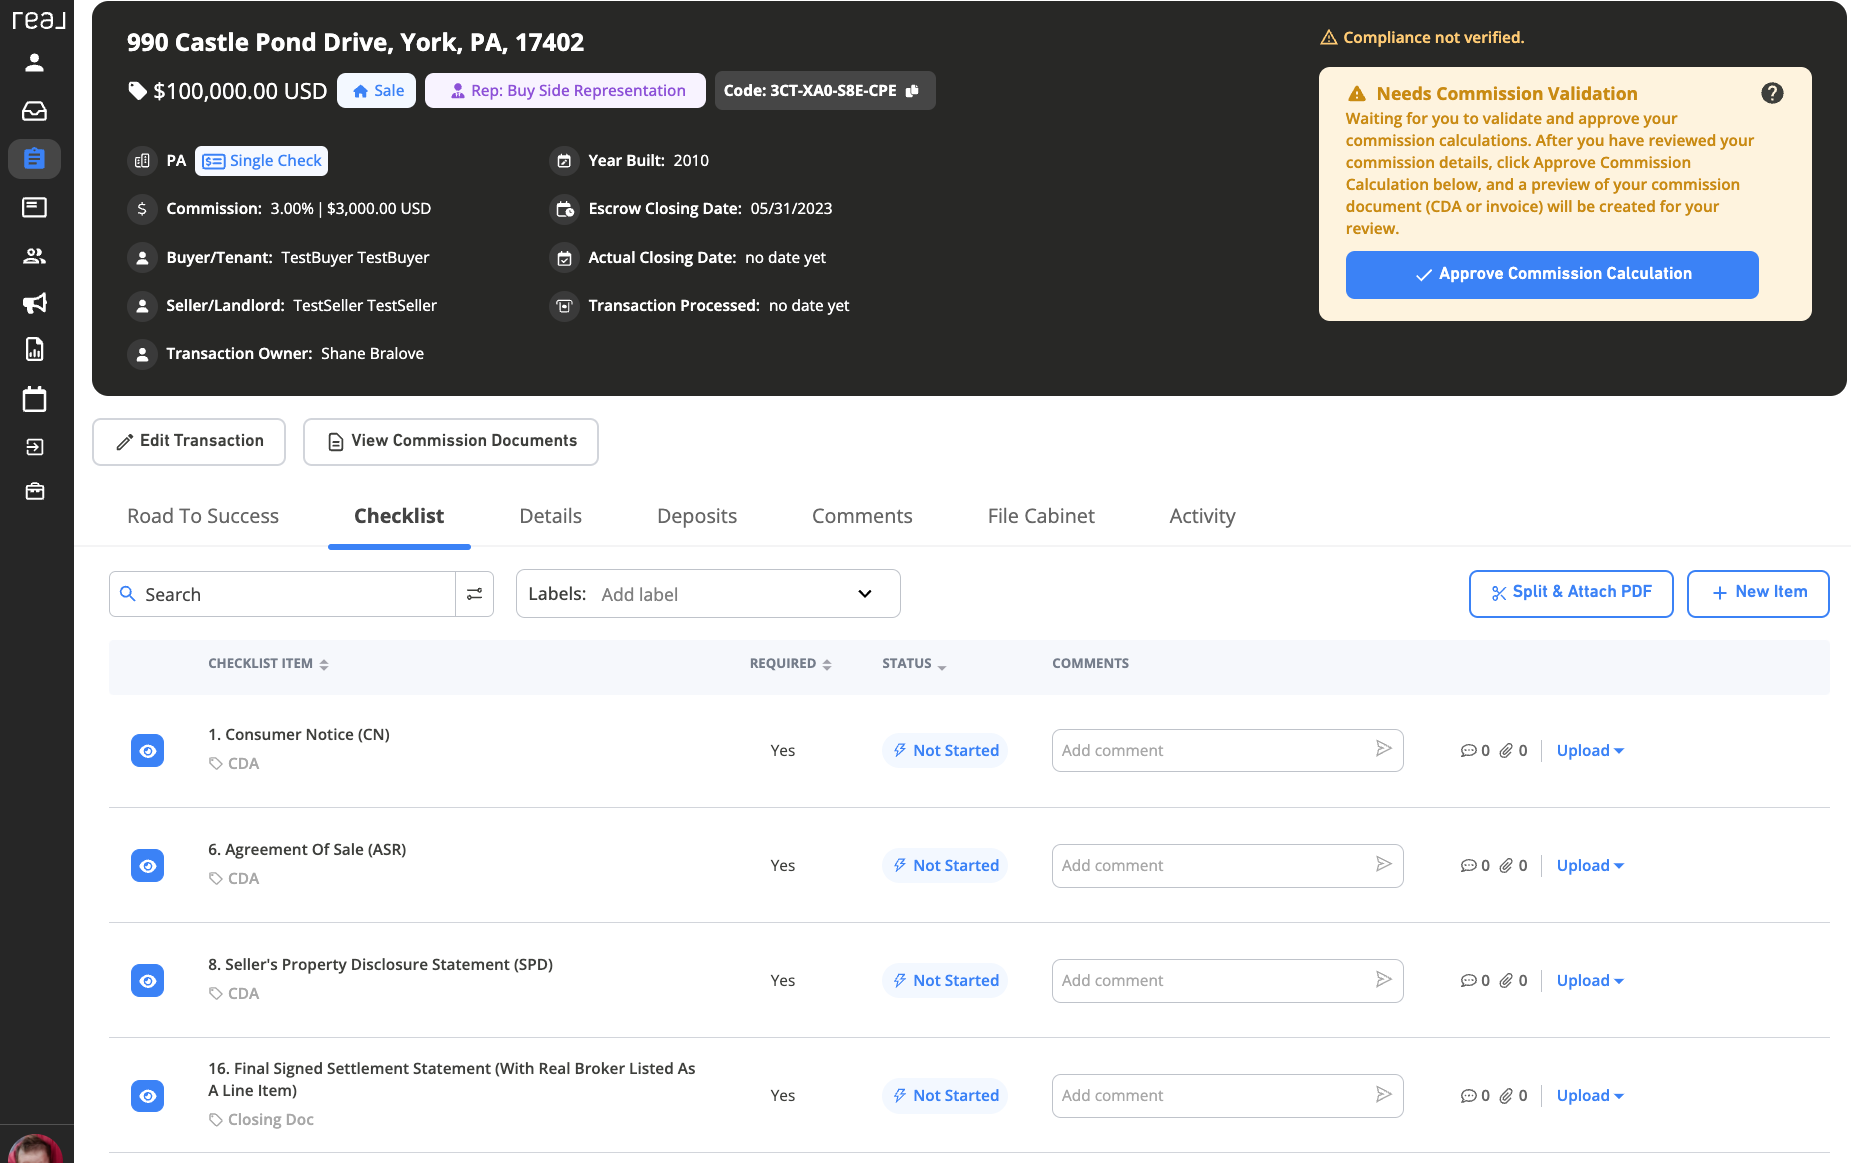
- 1Find your transaction checklist: Click Transactions on the left, open your transaction, then click the Checklist tab.
- 2Each checklist item is marked Required, Applicable (situational), or Optional. Required items must be uploaded.
- 3Method 1 — Upload from Device: Click the Upload button next to a checklist item, select 'from this device', and choose your file. Status changes to Pending.
- 4Method 2 — Email to File Cabinet: Copy your transaction's unique email address (shown on the transaction page). Email documents as attachments to this address. They'll appear in your File Cabinet within minutes.
- 5Method 3 — Drag & Drop to File Cabinet: Click File Cabinet, then drag and drop files from your computer. Files appear in the bottom section.
- 6Method 4 — Split & Attach: If you have a large PDF containing multiple checklist items, click the scissors icon to split it. Select pages, click Assign, and choose the checklist item.
- 7To attach from File Cabinet: Go to Checklist, click Upload next to the item, select 'From File Cabinet', choose the file, and click Attach.
- 8Once all documents are uploaded and showing Pending, your Broker will review them. Approved items are marked Completed.
What it looks like
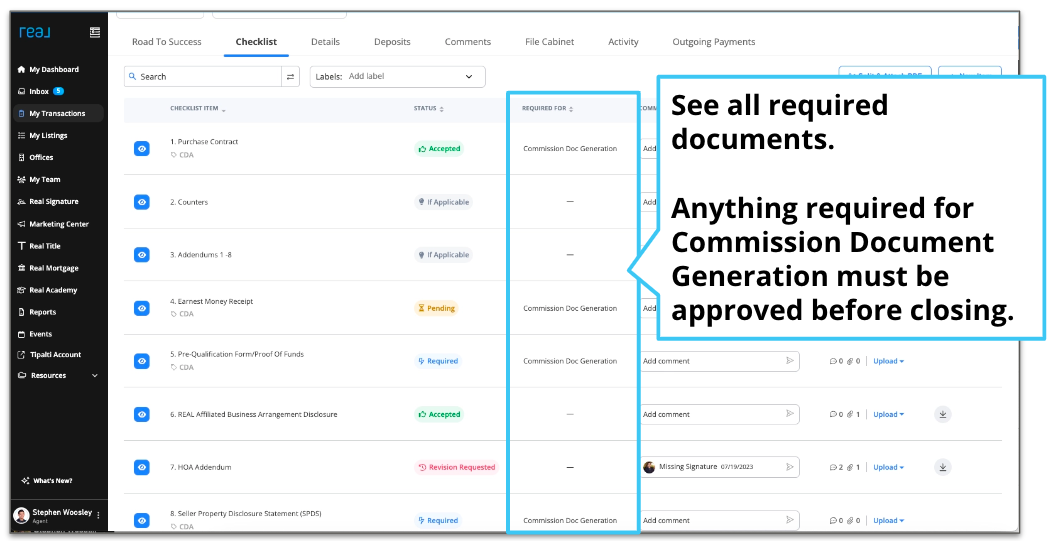
The Transaction Checklist — your new best friend for compliance
Items marked Required must be uploaded. Applicable items depend on your situation.
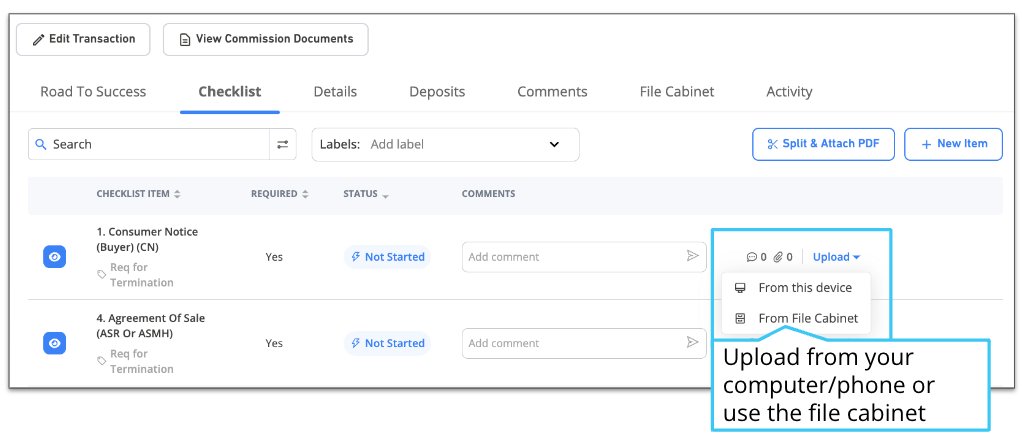
Click Upload to see your options: from device or from File Cabinet
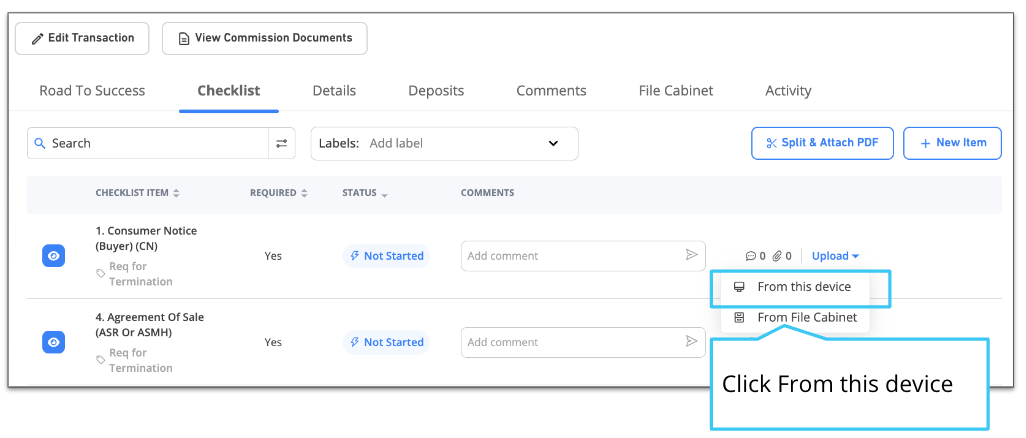
Select a document from your device to upload directly
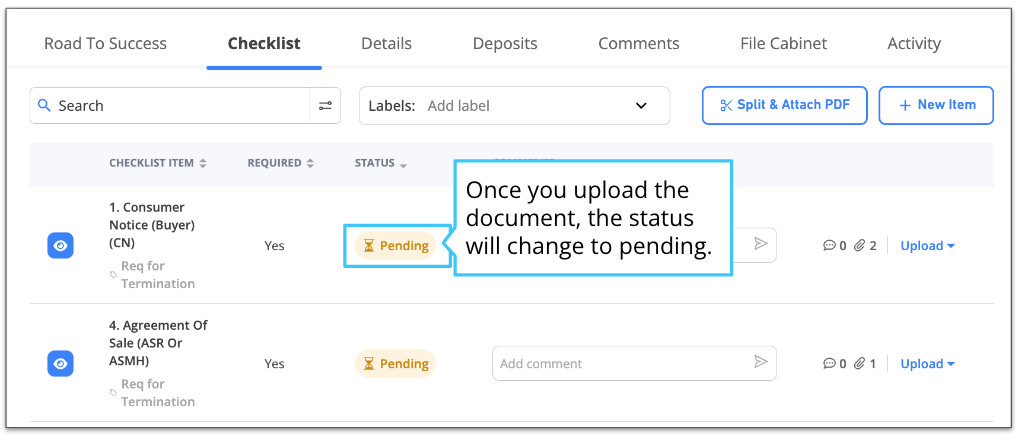
After upload, status changes to Pending — ready for Broker review
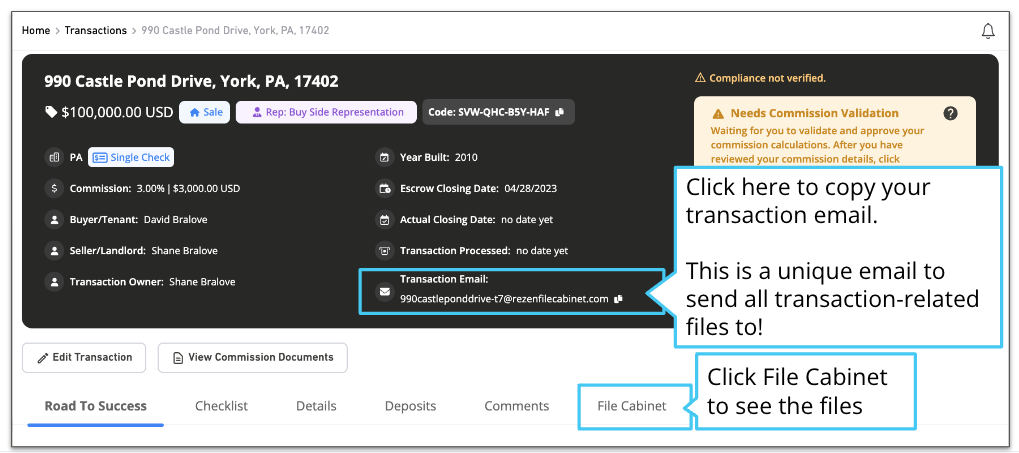
Copy your transaction's unique email address to send documents
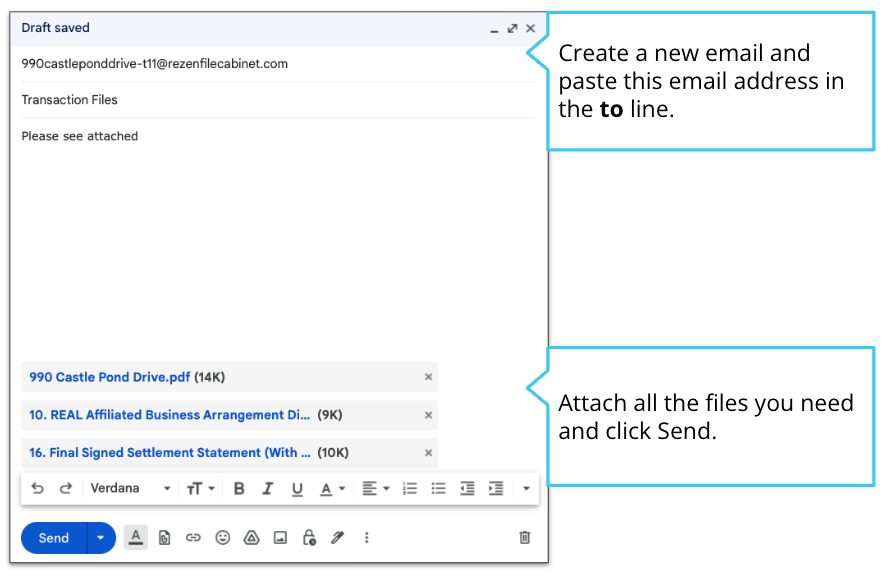
Email documents as attachments — they'll appear in your File Cabinet
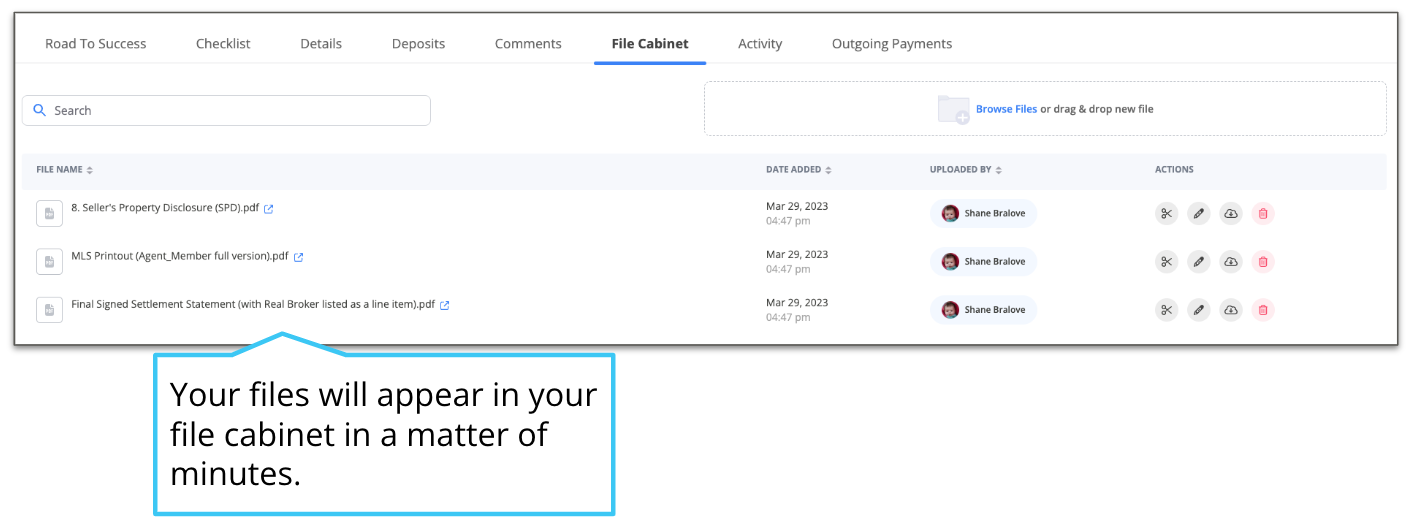
Your File Cabinet stores all uploaded documents for easy access
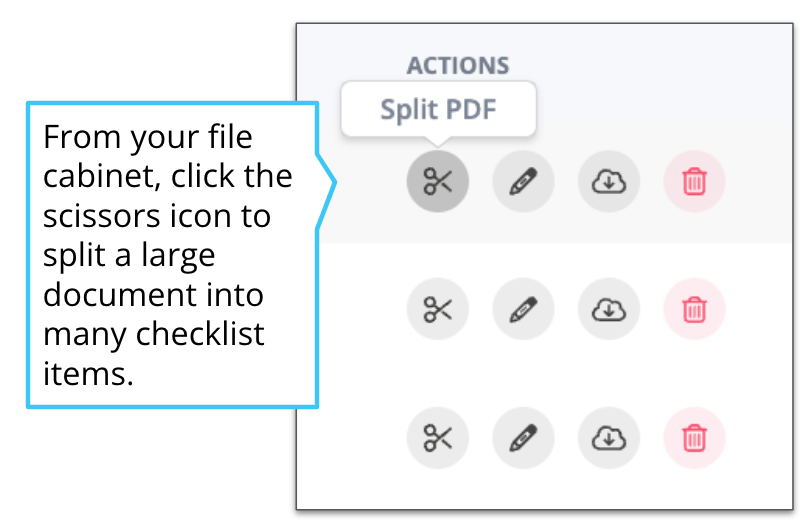
Use the scissors icon to split a large PDF into separate checklist items
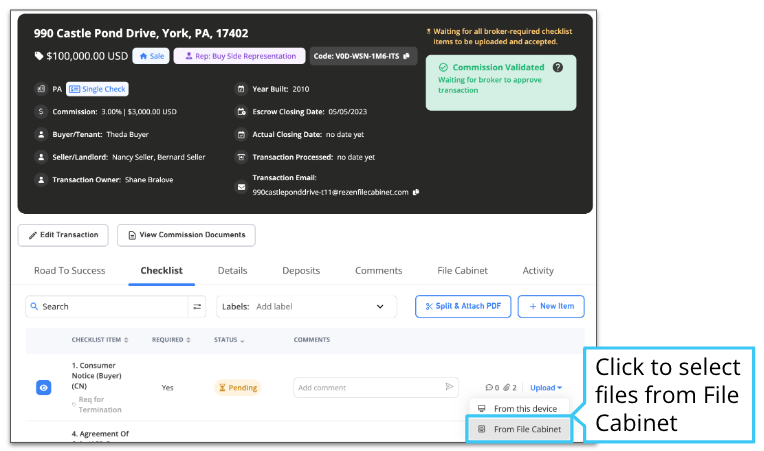
Attach files from your File Cabinet to specific checklist items
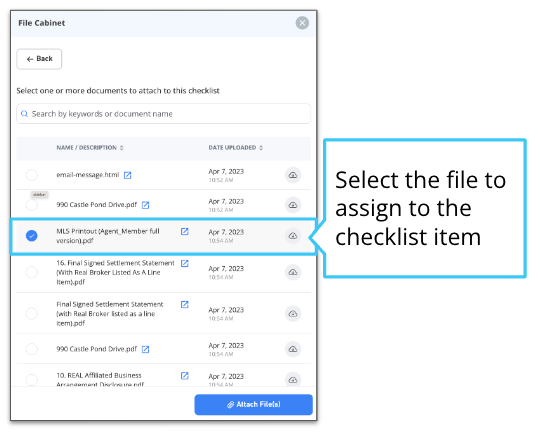
Select the file and click Attach to complete the upload
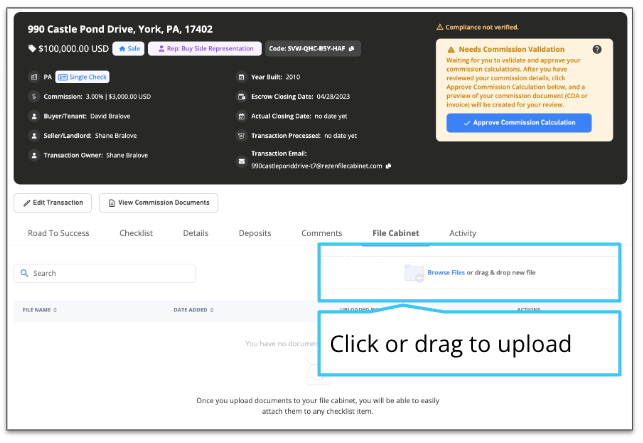
Drag and drop files from your computer directly into the File Cabinet
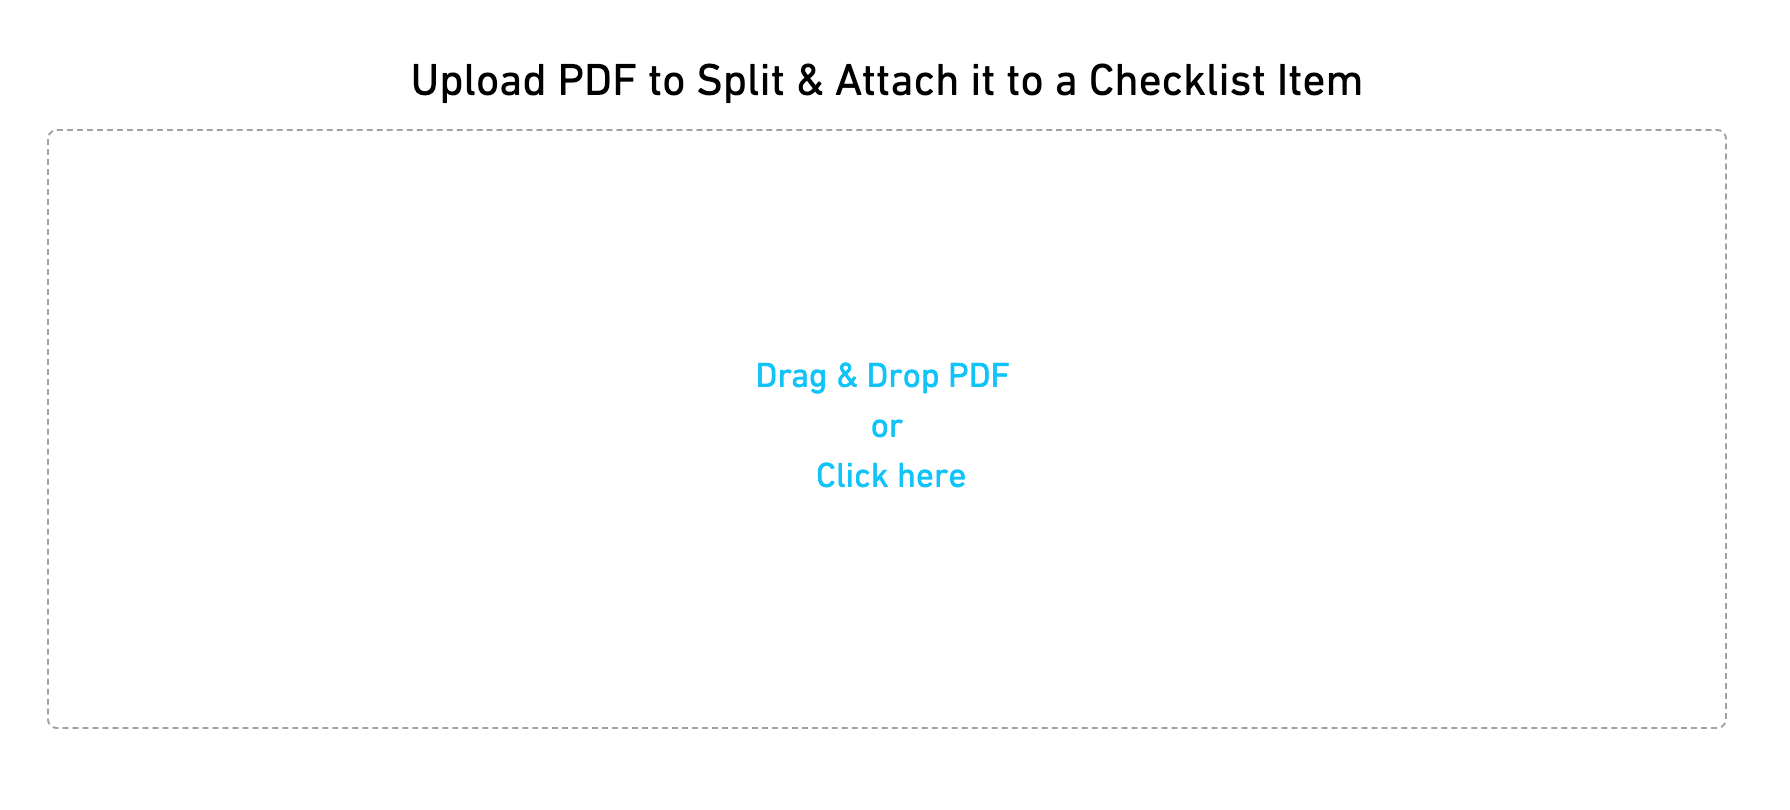
Upload or drag a PDF to split it across multiple checklist items
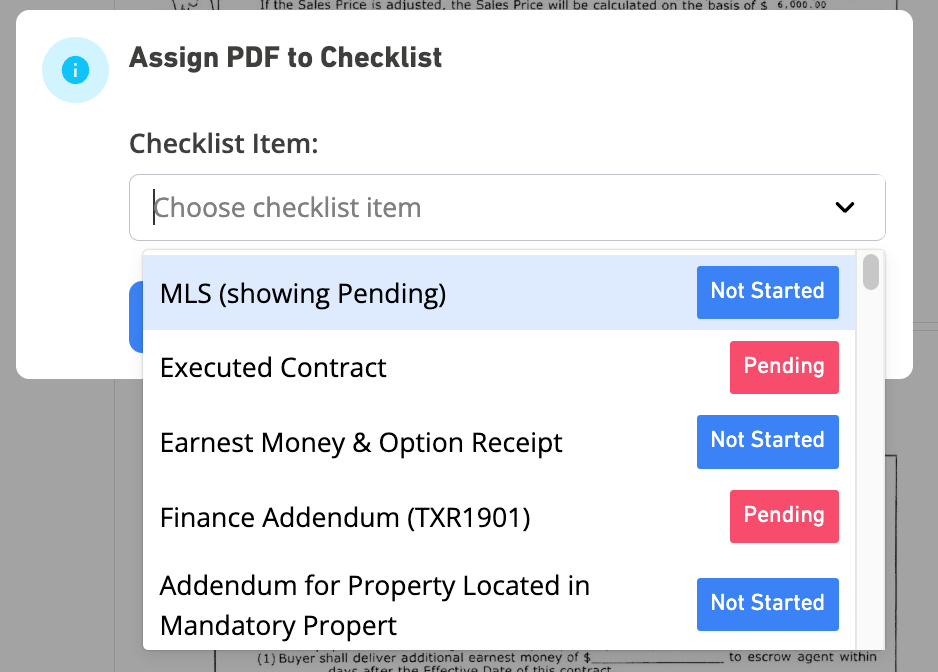
Select pages and assign them to the appropriate checklist item
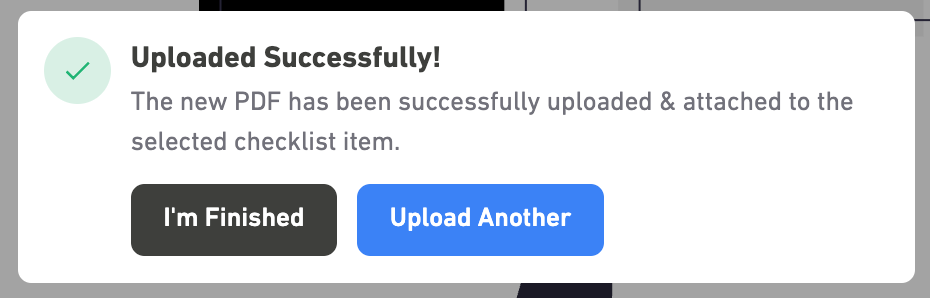
Repeat for each section of the PDF — each gets its own checklist assignment
Tips
The email-to-File-Cabinet method is great for forwarding documents you receive from title companies or other agents.
Use Split & Attach when you get a large contract packet — split it once and assign pages to multiple checklist items.
Don't forget to upload closing documents immediately upon receipt — your Broker needs them to finalize.
Pro tip: Use Real Signature to create templates and manage signatures for your documents.
Tips
reZEN is your central hub — use it to track financials, monitor cap progress, manage transactions, and upload compliance documents.
You can generate a CDA (Commission Disbursement Authorization) or Trade Record Sheet on demand and send it to anyone.
Real's mobile app lets you deposit checks directly from your phone.
Your first 30 days are critical for building momentum. Enter your first transaction and upload documents early so you're comfortable with the workflow.
Official links
Who to contact for what
Real Brokerage support emails
You're done with this step when:
- You've logged into reZEN and completed your profile
- You've created at least one listing or buyer transaction in reZEN
- You've uploaded at least one compliance document and it shows Pending status
- You've sent your first client update email
- You know how to use the File Cabinet and Split & Attach features
Set up your document templates
Goal
Configure Dotloop or Zipform with Real's broker information and create your document templates so you're ready to write offers on day one.
Before you start
- You have completed Step 5 (Set up Real systems)
- You have access to Dotloop or Zipform through your HAR membership
Do this now
- 1Choose your document platform: Dotloop (recommended) or Zipform — both are supported at Real
- 2Update your profile and company information with Real Brokerage details
- 3Create your document template folders (Compliance, Offer/Buyer, Listing/Seller)
- 4Set up Sellers Shield for free seller disclosures
- 5Follow the complete step-by-step guide linked below
What it looks like
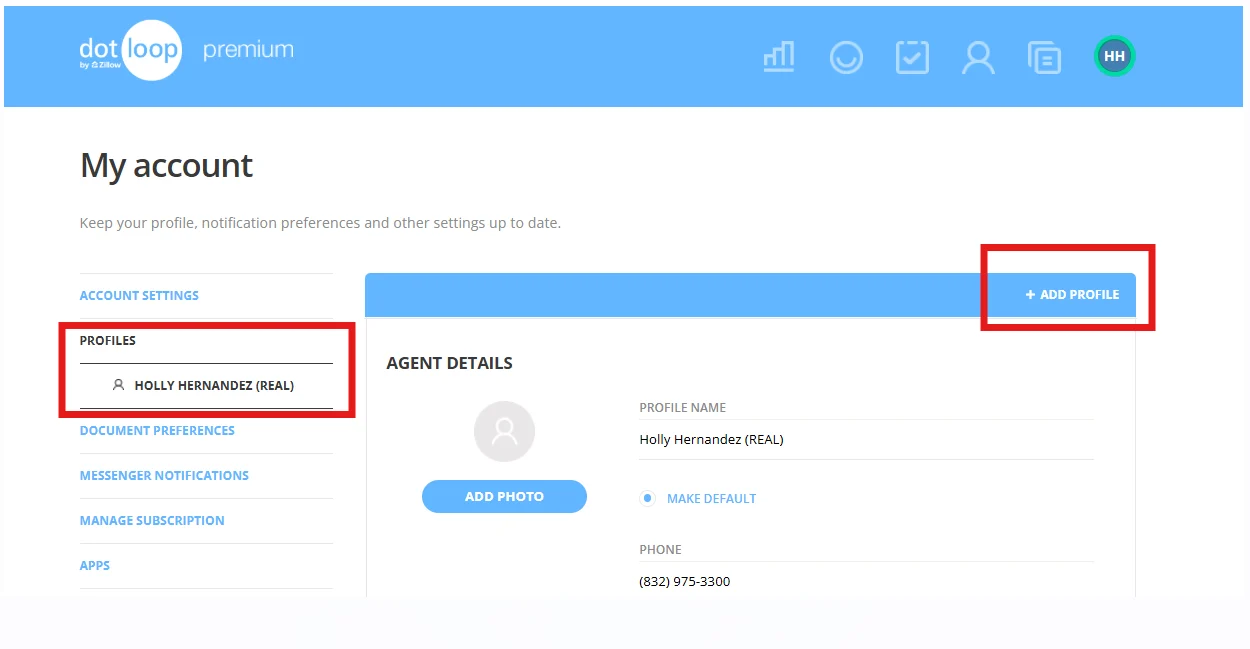
In Dotloop: go to My Account → Profiles → click + ADD PROFILE to create your Real profile
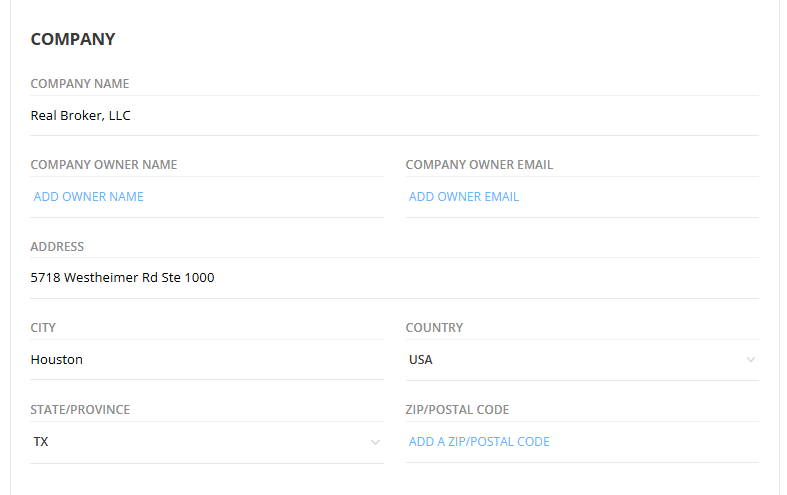
Fill in Real's company info: Real Broker, LLC | 5718 Westheimer Rd Ste 1000, Houston, TX 77057
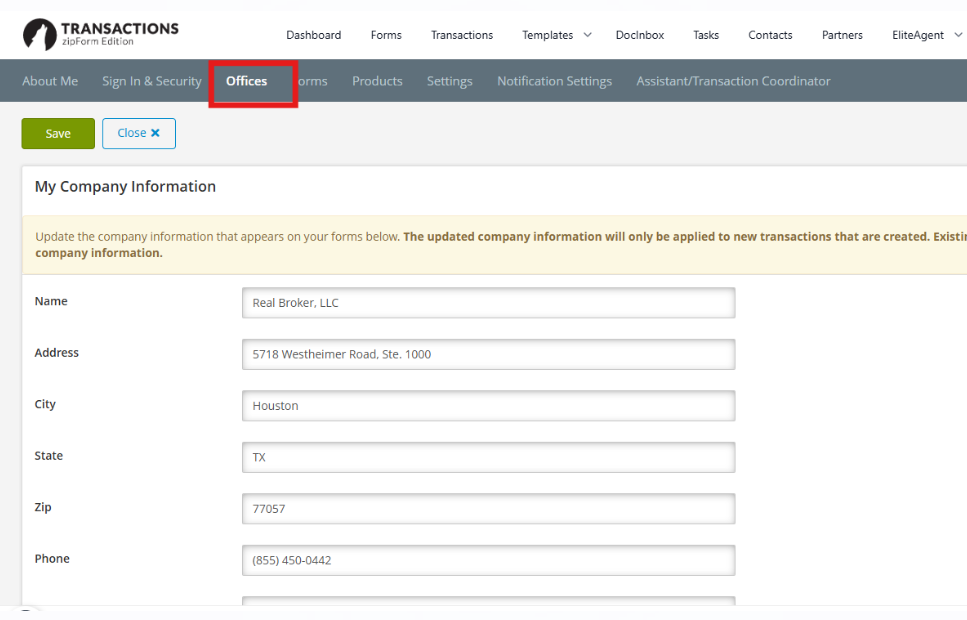
In Zipform: go to EliteAgent → Offices tab → update company info to Real Broker, LLC
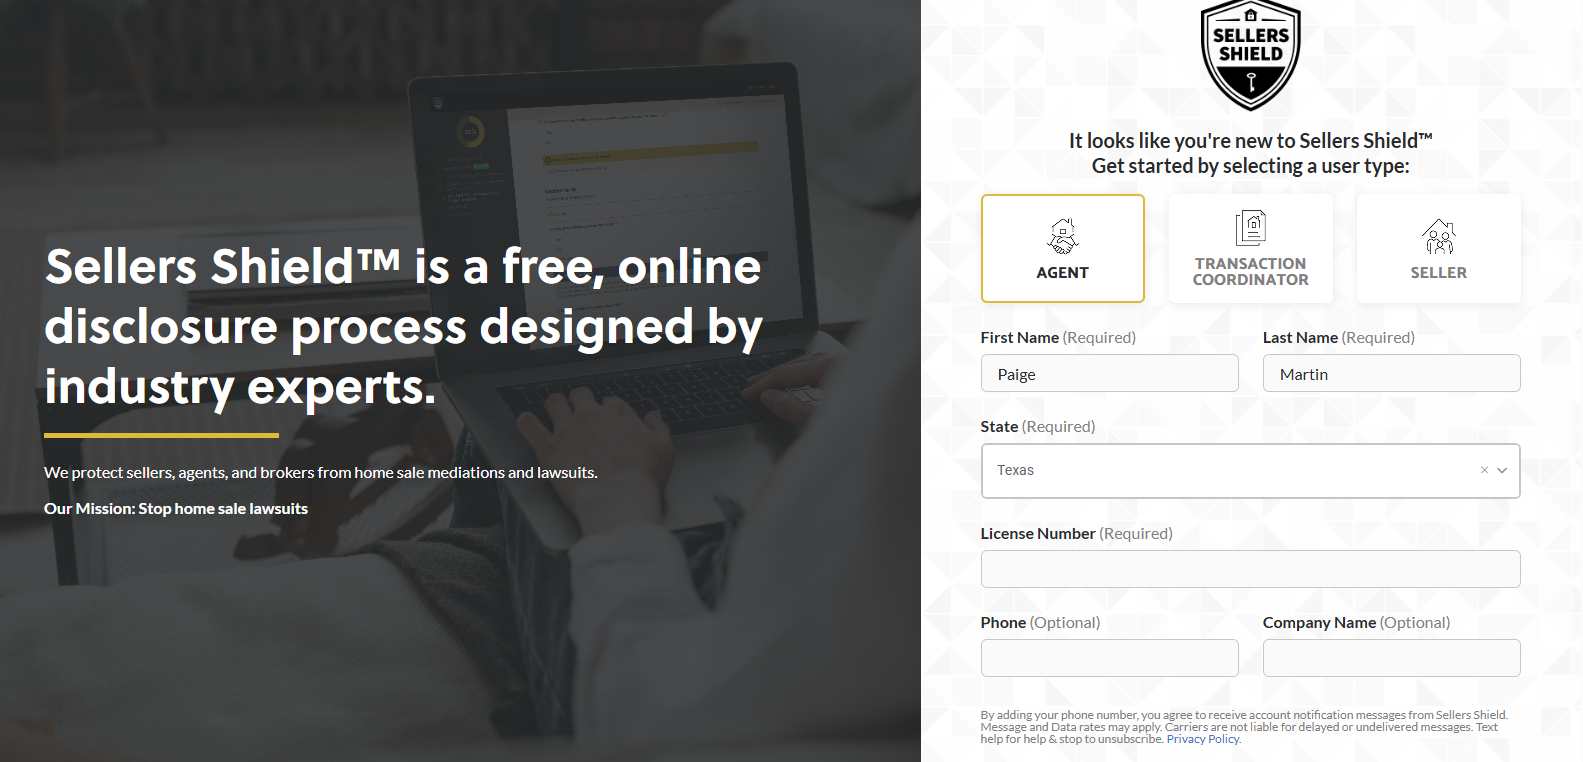
New to Sellers Shield? Select 'Agent', enter your info, and select Texas as your state
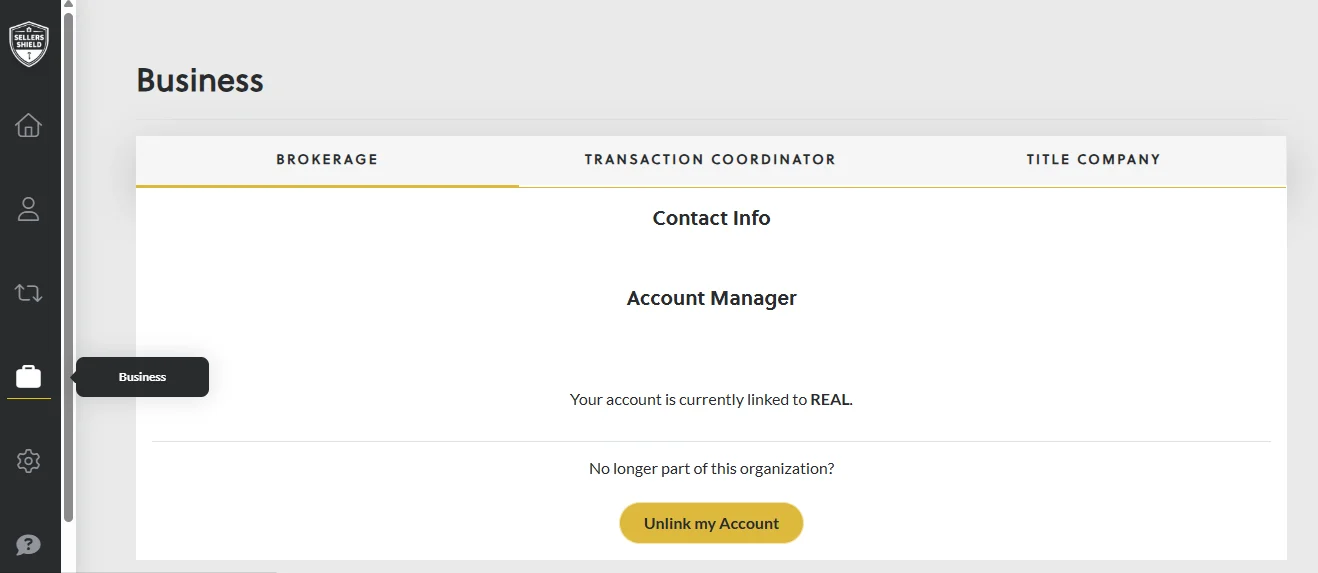
Your Sellers Shield account should show 'linked to REAL' under the Brokerage tab
Tips
Most agents use Dotloop — it's the more popular choice at Real and integrates well with reZEN.
You can use both Dotloop and Zipform if you prefer. Some agents use Dotloop for buyer-side and Zipform for listing-side.
Sellers Shield is free for all Real agents. It protects you from seller disclosure lawsuits.
If you're having trouble linking your Sellers Shield account to Real, email support@sellersshield.com and mention you're with Real Broker, LLC.
Prefer video? Watch the Real Agent Success training series for walkthroughs: https://www.real.academy/real-agent-success
Official links
You're done with this step when:
- Your document platform profile shows Real Broker, LLC as your company
- You have created template folders for Compliance, Offer/Buyer, and Listing/Seller documents
- Your Sellers Shield account is linked to Real
- You can create a new transaction with Real's broker information pre-filled
Set up kvCORE (included at no extra cost)
Real includes kvCORE, a full CRM with IDX website, lead routing, and automated follow-up. Get started here:
Access kvCORE from realmoneYour next steps
Your transition is done — now help grow your network
These are your channels — built to spotlight REN agents, your listings, open houses, and market wins. The bigger the audience grows, the more reach you get when we feature you. Help build it by following and subscribing.